Use the Materials window to maintain material densities and unit weights for plates, stiffeners, beams and pipes. The material records are stored in the connected historical database, rather than as individual weight items in the current project. They provide reusable data for material-based weight calculations.
Open the window
From the main window, choose Database > Materials > Plating..., Girders..., Beams... or Piping.... These commands open the same Materials window with the corresponding material type selected. Use the tabs to switch between Plates, Stiffeners, Beams and Pipes.
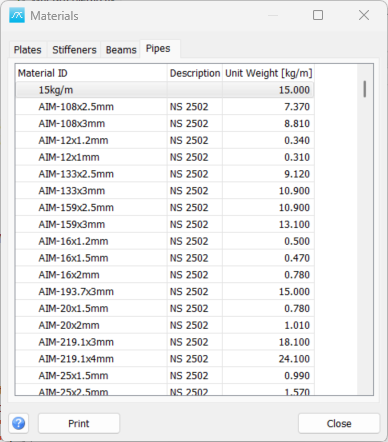
Material fields and units
Material ID: Identifies the material or section within the selected material type. Use an ID that distinguishes it from other records in that type.
Description: Describes the material, section or product.
Unit Weight: The value used in material-based calculations. Its meaning depends on the selected tab:
·Plates: Material density, shown in t/m³ for metric projects or lb/ft³ for US-unit projects. This is weight per volume, not weight per plate or per square metre.
·Stiffeners, Beams and Pipes: Weight per length, shown in kg/m for metric projects or lb/ft for US-unit projects. This is not the total weight of the member.
Check the unit shown in the column heading before entering or importing values. The application converts between displayed units and the values stored in the database.
Add or edit materials
Use the empty row at the bottom of the selected tab to enter a material. Enter a Material ID, a description and the appropriate density or unit weight. Edit an existing record's cells to change its values. Finish the cell edit to write the change to the database.
Click a column heading to sort the list by that field. Click it again to reverse the sort direction.
These changes affect the shared material data in the connected database. Closing the window does not undo edits already saved. Changing a material record should not be taken as confirmation that previously entered project weights have been recalculated; review the relevant calculation separately.
Copy, paste and delete
Select material rows and use the right-click menu:
·Copy: Copy the selected rows, including column headings, for use in a spreadsheet or another application.
·Paste: Read material records from tab-separated clipboard data. The fields follow the order Material ID, Description and Unit Weight. Review the data and the displayed units before pasting.
·Delete: Remove selected material records from the current material type.
·Select All: Select the listed material rows.
Pasting uses the material ID in the current material type to identify existing records. It can update existing material data as well as add new records. The available operations depend on the user's permissions.
Import and export text files
Right-click the list and choose Import Text File... to load a tab-delimited text file. The file must contain a header row followed by the fields ID, Description and UnitWeight, in that order. Choose the destination material tab before importing. Numeric unit weights are interpreted in the units currently displayed for that tab.
For example, on the Plates tab in metric units:
ID Description UnitWeight
STEEL Steel 7.85
This example defines a density of 7.85 t/m³. It would have a different meaning on a tab that uses kg/m.
Choose Export Text File... to export the current material type to a tab-delimited text file. The export includes the header and all records of that type, with values converted to the displayed units; it is not limited to the selected rows.
Importing text can update the description and unit weight of an existing material with the same ID in the selected type, or add a new material when the ID is not found.
Import from another historical database
Choose Import Historical Database... from the right-click menu and select the source SQL Server and historical database. The command imports records of the currently selected material type into the connected historical database. Existing records with matching IDs can be updated from the source, and missing records are added.
Print and close
Use Print, either on the button row or in the right-click menu, to open the material print preview for the current type. Click Close to close the window. Editing, importing, exporting and printing require the corresponding access permissions.