Use Import MON to import a MON project database into the current project. Open Project > Import > External Sources > MON... in the main window. The window combines a MON source view, field mapping and an import preview so that you can check the result before writing project data.
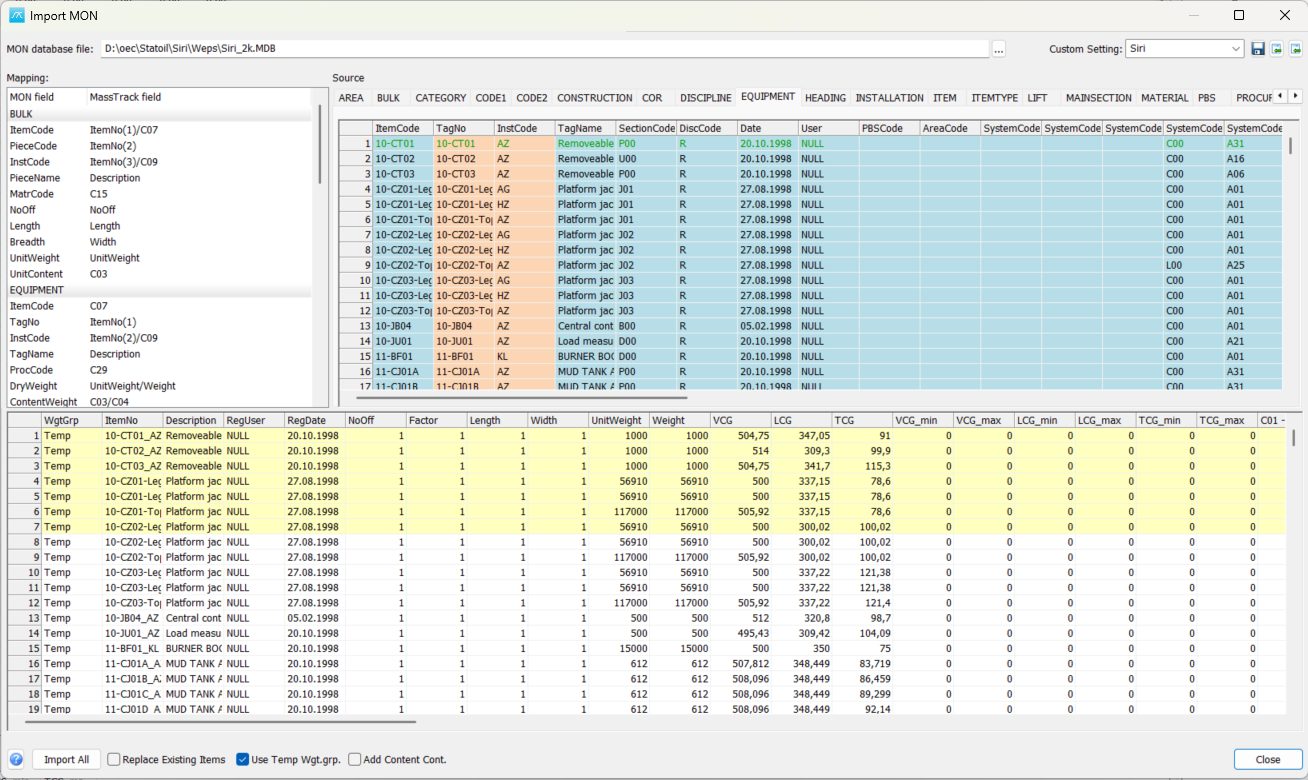
Select the source and import setting
MON database file: Click ... and select the MON Access database file (.mdb or .accdb). Check that this is the intended source project before importing.
Custom Setting: Select a saved MON import set, or enter a name when saving a new set. A set records the field mappings and related import choices. Use a set suited to the structure of the selected MON database.
Save icon: Save the current MON import set under the specified name. Save mapping changes before copying a setting from another project or creating a Custom Import set.
Import setting icon: Select a source database and project, choose a saved MON setting and give the independent copy a destination name. This copies the import configuration, not the MON source database or its item data. Older settings must first be saved from the MON dialog before they can be copied.
Custom Import icon: Create a Custom Import set from the saved MON import set, then open Custom Import. Specify a name and confirm replacement if that Custom Import set already exists. The MON file and a saved MON set must be specified first.
Check source data and field mapping
Source Data: Choose a MON table tab to inspect its source rows. The tables include classification data and the BULK and EQUIPMENT item sources. Drag the divider to give the mapping or source pane more space.
Mapping: Inspect how MON fields are connected to destination item and code fields. Double-click an editable destination cell, or right-click and choose Specify MassTrack field..., to select the destination field. Review the resulting preview after changing a mapping.
Wgt.grp. field: Right-click the MON classification field to use as the destination weight group and choose Set Wgt.grp. field. The field must exist in both BULK and EQUIPMENT in the selected file. Use Remove Wgt.grp. field to clear the choice. A valid weight-group field must be selected before importing items.
The lower table shows the prepared import result for the selected source table. Check weight groups, item numbers, descriptions, weights, coordinates, code values and units before importing. A preview does not write the items to the project. If a required mapped source field is missing, correct the mapping rather than importing an outdated preview.
Import options
Replace Existing Items: For existing records, allow blank imported non-key values to clear the corresponding stored fields. When cleared, blank source values leave those stored fields unchanged. Non-blank imported values can still update existing records; leaving this option cleared does not mean existing items are skipped.
Use Temp Wgt.grp.: Use the configured temporary weight group for imported item rows instead of their mapped weight group. Check the preview and the project temporary-group configuration before using this option.
Add Content Cont.: Include the MON content contingency in the calculated content value. This is part of the import calculation; check the resulting calculated fields and preview to avoid counting the same contingency twice.
Import and verify
Import All: Import the prepared tables, including the classification data used by the item tables, into the current project. BULK and EQUIPMENT are processed after the supporting tables. Check the destination project and mapping first. Import requires the WgtInfo Import/Export permission.
Preview menu: Import: To import only rows from the selected table, select the required rows in the lower preview and choose Import from its right-click menu. Select All selects the complete preview for that table. Confirm the selected item count before proceeding.
Preview menu: Copy Table: Copy the preview table to the clipboard for inspection or comparison.
Source vs. Test Report: Compare the source and prepared import values in a print preview. Use this before importing to check the transformation.
Source vs. Project Report: Compare the source with the current project values. Use this to check the destination data and review the result after import.
Import writes changes while the window is open. Closing the window does not undo records already imported. After importing, inspect the affected items and code definitions in the project and review any messages about missing or inconsistent data.
Close: Close the window, offering to save changes to the MON import set. Saving the set saves the configuration; it is separate from importing the data.
Help: Open this topic. F1 opens the same help page.
For the general Custom Import workflow, see 4.10.5 Custom Import.