In this section we will go through step by step how to:
oCreate and Edit Work Breakdown Structure.
oCreate Project Type Structure.
oCreate Own Parameters.
oCreate Parameter Views.
Step 1: Prepare an Excel Sheet with your WBS
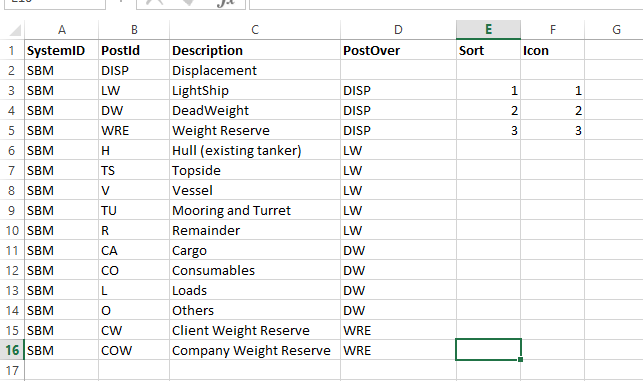
We need to start out with preparing an Excel Sheet that has the following columns:
•SystemID – this is the name of the system you want to create and should be same for all rows in the Excel.
•PostID – this column will hold the ID of the various weight groups.
•Description – this column holds the description of the weight group.
•PostOver – this column should have the ID of the parent group.
•Sort (optional) – used to add numbers to force a specific order within a level. If not used, the groups will be sorted alpanumerical.
•Icon (optional) – used to add a number to specify a specific icon to be related to the group.
Some special considerations:
•The topnode needs to have PostID set to DISP (unless otherwise specified in the system setup window, see later in this document) and should have a blank field for the PostOver column.
•Every level of weight groups that is supposed to be used for parametric estimation (often all without loads and reserve groups), should have a “Remainder” group as the last group in that level. A remainder group has a PostID that ends with the letter “R”.
The below shows a small sample of a prepared SWBS in Excel.
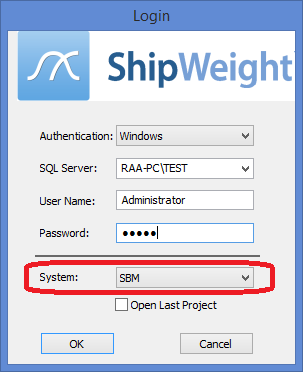
Step 2: Start ShipWeight and Log on
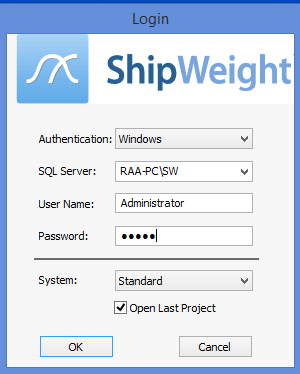
Start ShipWeight and log in to ShipWeight using the user name “Administrator” and password “admin”.
The system will be default be set to “Standard”.
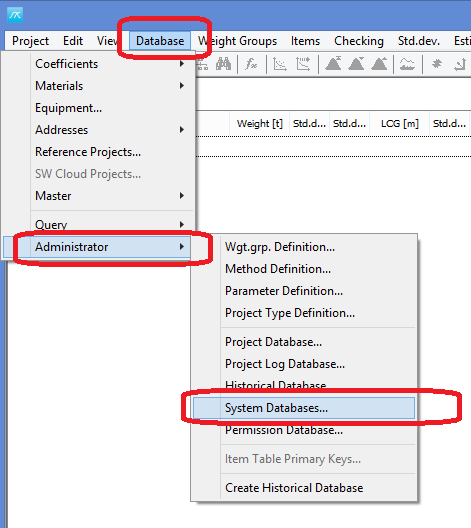
Step 3: Open up the System Database Creation window
Open up the System Database window by go to the menu Database->Administrator->System Databases…
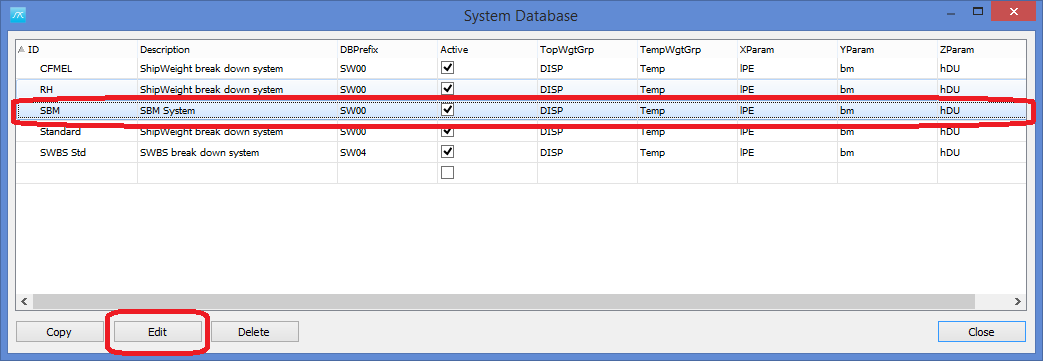
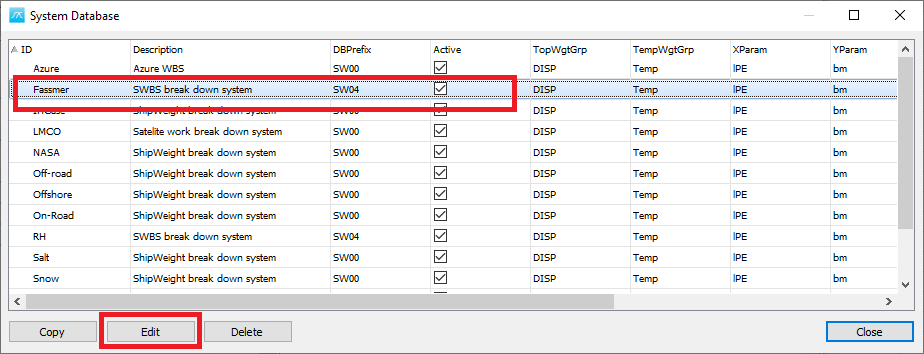
Step 4: Make a copy of one of the existing WBS structures:
Select the row named “Standard” in the System Database window and then click on the “Copy” button.
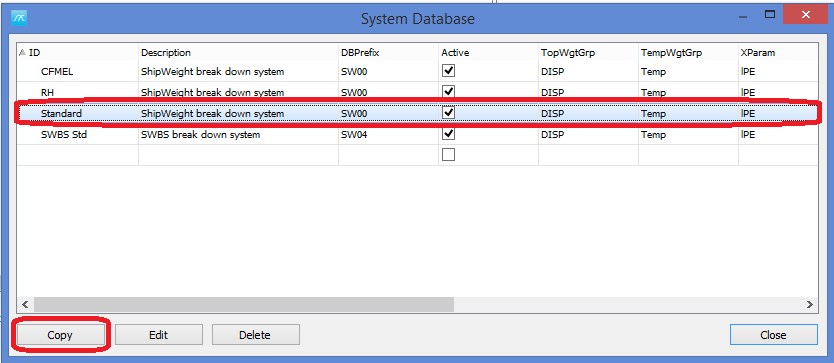
Type in the ID for the new system you want to make in the pop-up window. Note that this ID will have to be the same as the one you have in the SystemID column in the spreadsheet.
Then click OK.

Step 5: Edit the new WBS structure
A new line will now appear in the System Database window, with the new system ID. This is now a copy of the standard system. We will now edit this to make it into the new system. Select the new line and click the “Edit” button as shown on next page.
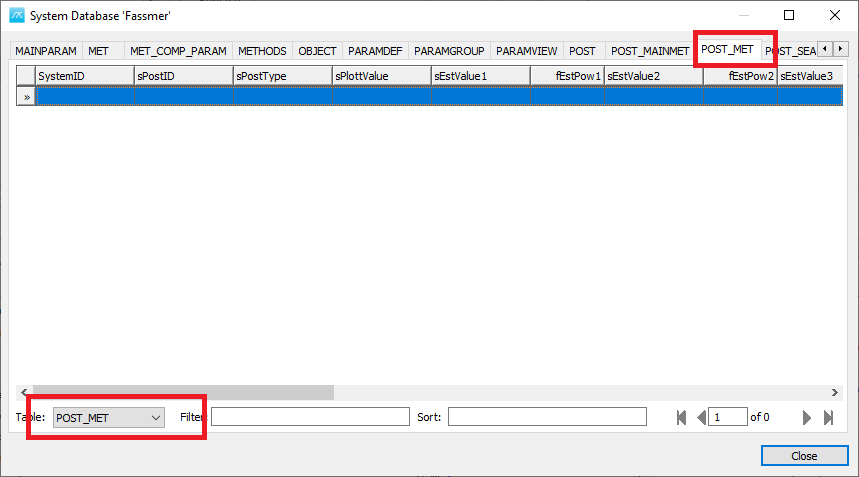
A window with the system database tables will show up. Here select the “POST” table by selecting it from the droplist in the lower left corner of this window. Next, select the small square at the upper left corner of the table to select all rows (our right-click in the table and select “Select all” from the submenu).
Hit the “Delete” button to delete all rows in this table.
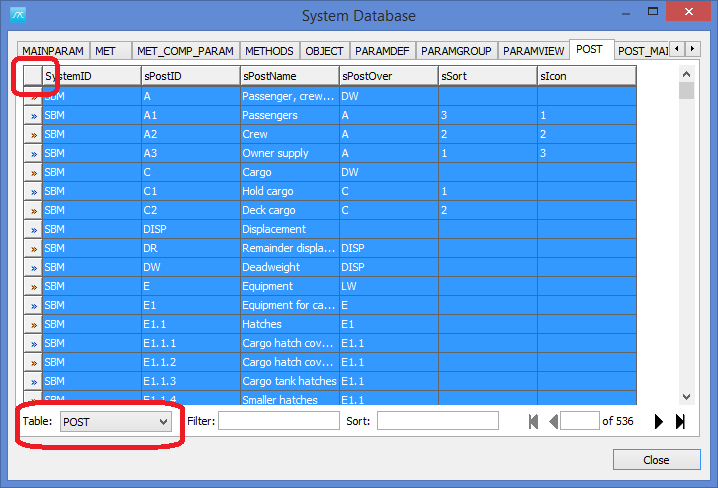
Now, copy the table from you Excel sheet with the work breakdown structure and paste it into the now empty “POST” table in this view (do not copy headers).

Finally, select the “POST_MAINMET” table, select all rows in this table and delete them.
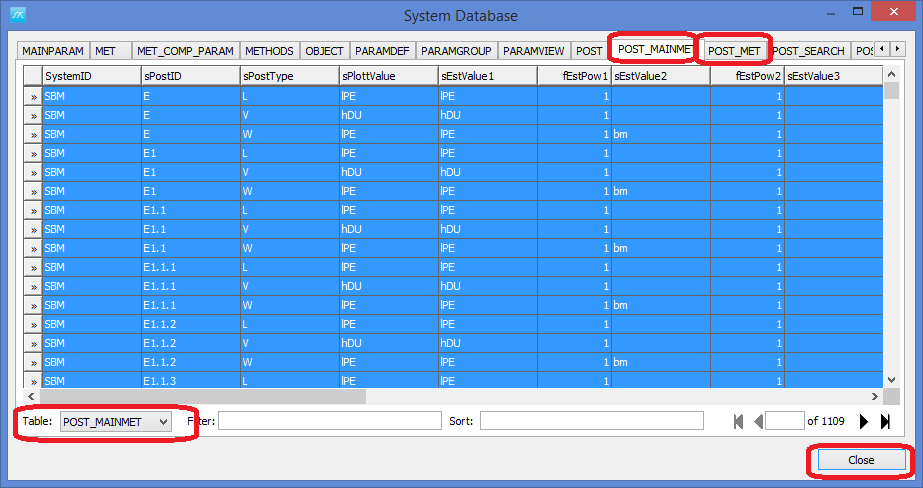
Repeat the same (delete rows) also for the “POST_MET” table. Then close this window.
Step 6: Restart ShipWeight with the new Structure
Now you are read to also close the System Database window and also close down ShipWeight (menu: Project->Exit) and restart ShipWeight with your new system.
When you restart ShipWeight, select your new system from the “System” droplist in the Login window. Log on with username “Administrator” and password “admin”.
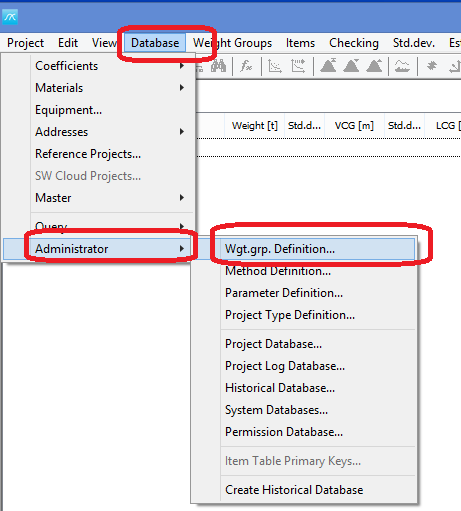
Step 7: Make any necessary changes to the new WBS
If you need to make any changes to the weight groups in the new WBS, this can now be done from the Database->Administrator-Wgt. Grp. Definition… menu.
This will open a window displaying the new WBS>
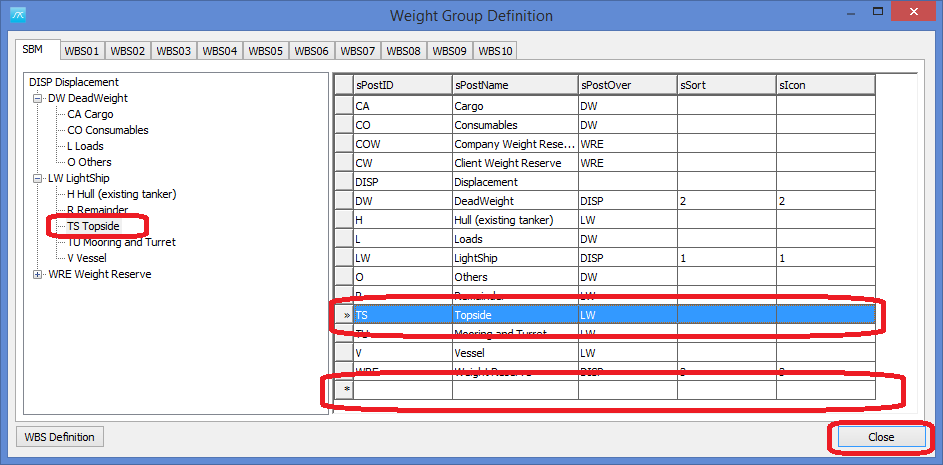
In the window you can use the treeview to the left to navigate and select nodes in the WBS, then alter values for the corresponding group in the grid to the right.
Note: You can also add a new weight group by adding the weight group information in the last row (marked with a *). If you do this, make sure you move to the next row (or another row in the grid) after the information has been entered before you close the window.
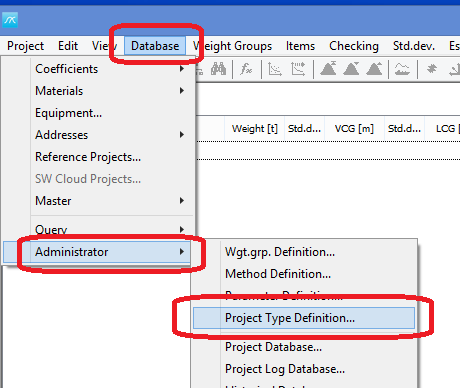
Step 8: Open the Project Types window
Open up the Project Type window by going to menu Database->Administrator.>Project Type Definition…
There are two types of project types:
•Main Type
•Sub Type
You can add a Sub Type to an existing Main Type, or you can add a new Main Type to hold new Sub Types.
Main Type and Sub Types have a numeric ID and a name. Then ID of a Main Type can be anything from 0 to 99 as long as it is not taken by an existing Main Type. The Sub Type ID will be the ID of the Main Type + anything from 00 to 99.
This means that if 10 Main Types exists (Main Types are the top nodes in the treeview to the left ) a new Main Type entered would then have 11 entered in the “ID” column, a name entered in the “Name” column, and a blank entry in the “Parent” column.
Sub Type of this new Main Type, would then have IDs 1100, 1101, 1102, etc and the “Parent” column should be set to 11.
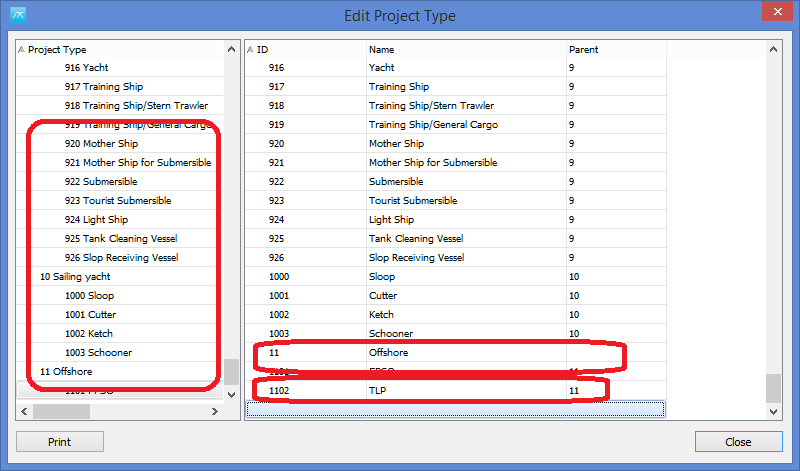
When you add new line to the list, after entering information into the cells, click the next cell above to make the list update itself, then scroll to the bottom to see a new line ready for a new entry.
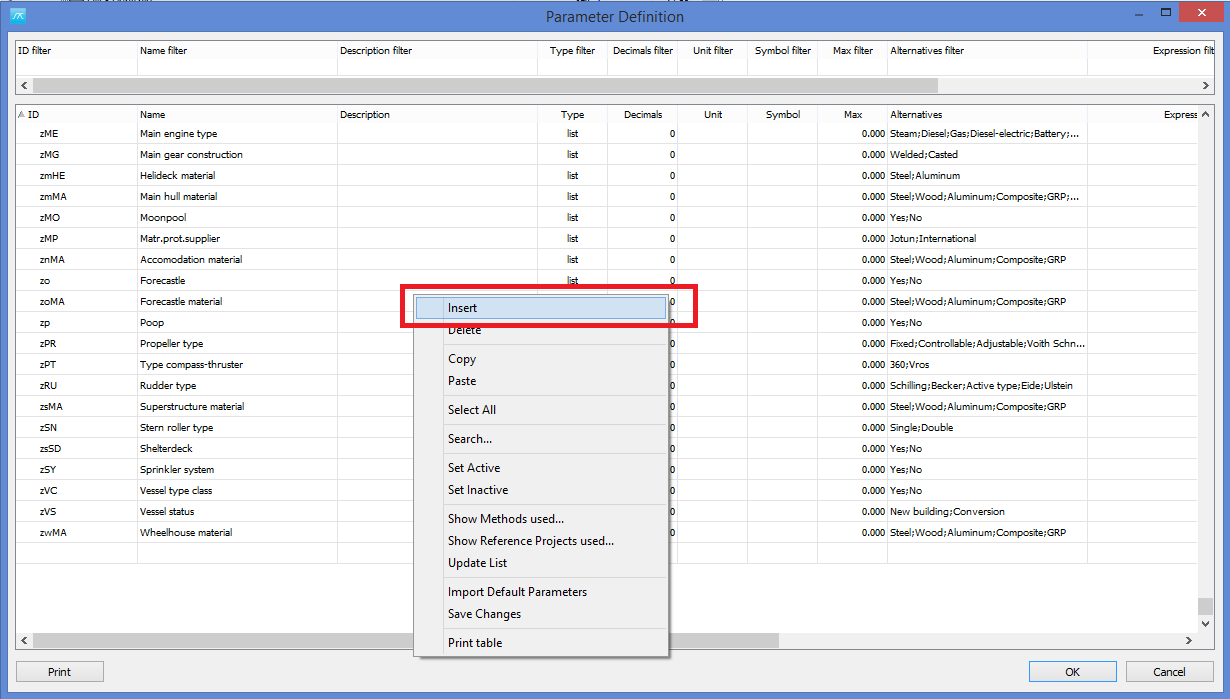
Step 9: Create the new Parameters
In ShipWeight main window, go to menu Database->Administrator->Parameter Definiton…
In the Parameter Definition window that opens, scroll to the end of the list, right-click the list and select “Insert”. These parameters will be available for all projects.
In the new line that appears, click once in the first grid (may take a sec. before it becomes active) in the column ID and when it becomes editable, type in arcRHO as ID.
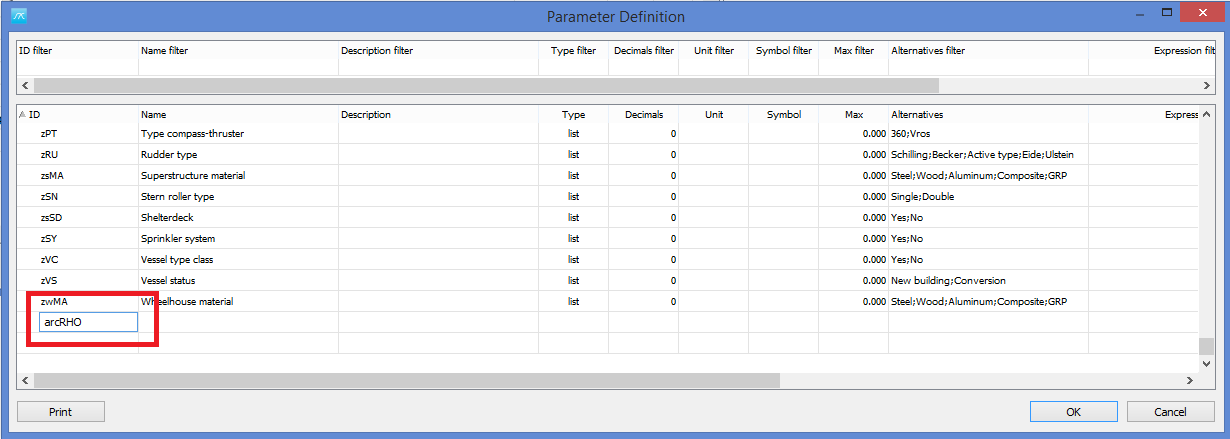
Click the tabkey to go to the next column (Name) and fill in Seawater density. Continue for the next columns and set Type to decimal, Decimals to 4 (or 3 if you prefer), unit to t/m3 and Symbol to Rho. Finally set Max to 2 (max allowed input).
The end result should be like this:
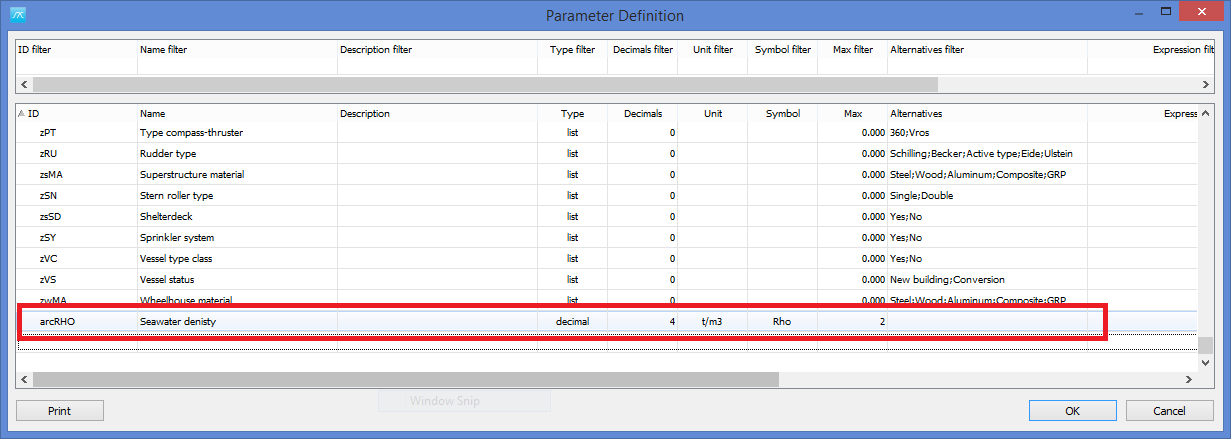
Once again, right-click the list and click “Insert” and add the Prop. Power parameter, name the ID arcPP and fill in the appropriate column values. Repeat for Class, Auxiliary Power, and Interior area. The input may be something like this (you may alter all values here except for the ID – the ID is referred in the report and must be the same as in this document:
ID |
Name |
Type |
Decimals |
Unit |
Symbol |
Max |
arcRHO |
Seawater density |
Decimal |
4 |
t/m3 |
Rho |
2 |
arcPP |
Propulsion power |
Integer |
0 |
kW |
P |
1000000 |
arcCl |
Class |
Text |
0 |
- |
C |
0 |
arcAD |
Auxiliary Power |
Integer |
0 |
kW |
P |
1000000 |
arcIA |
Interior area |
Integer |
0 |
M3 |
A |
1000000 |
The end result should look something like this:
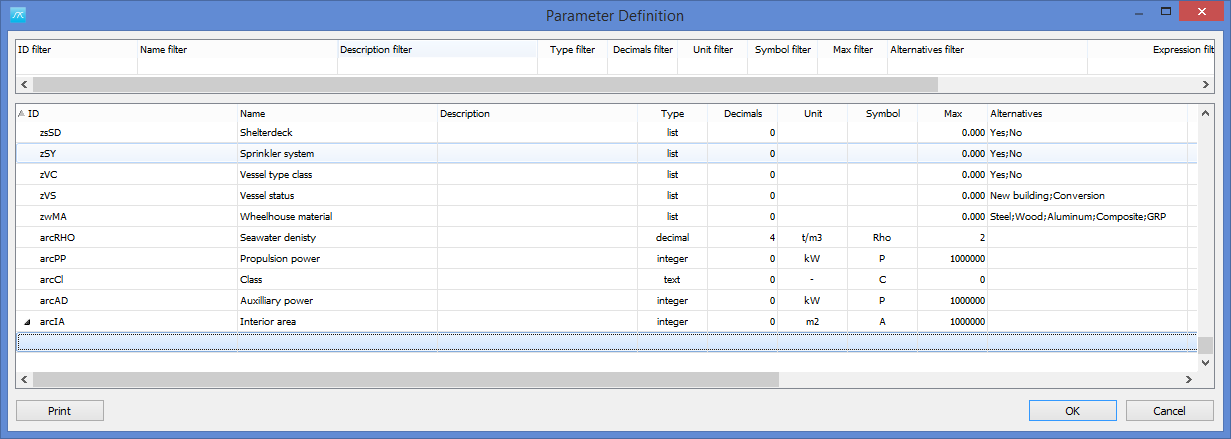
Next click “OK” and answer “Yes” to pop-up asking to reload new parameters.
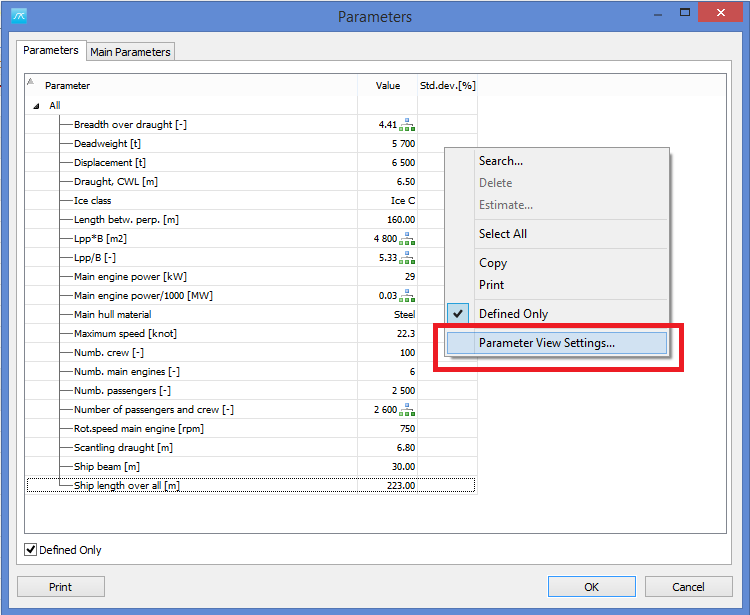
Step 10: Make Custom Parameter View for New Parameters
This step is strictly speaking not necessary per se, but it will make it more convenient to find and fill in these parameters. As with the parameters themselves, the parameter view you make here will be available for all projects.
Start by going to menu View->Parameters… in the Parameters windows, right-click and select “Parameter View Settings…”:
In the Parameter View Setting window, right-click again and select “Add View”
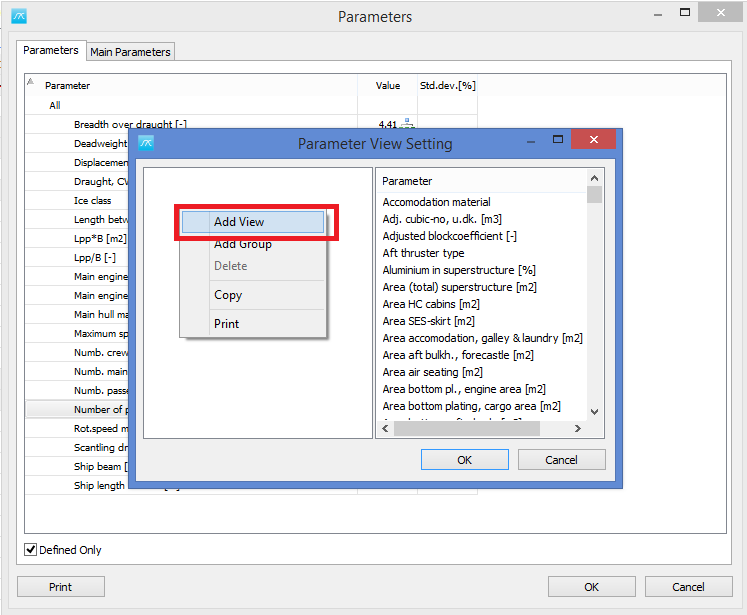
Type in “Arctech” (or whatever you like really) as name of the new View in the grid that appears. Right-click again and select Add Group in the menu. Give in the name “Report parameters” (or something) as name of the group.
Next, right-click in the Parameter list in this view and select “Search”.
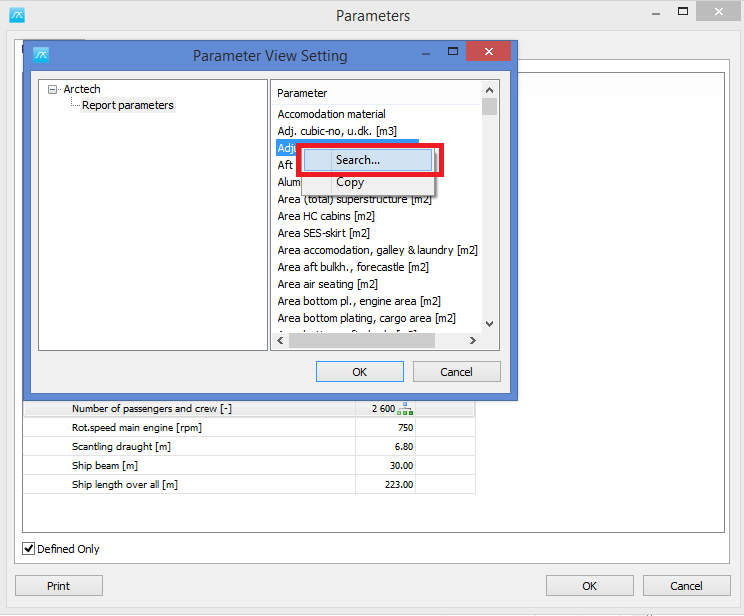
Start to type in “Sea” in the search window to find the Seawater density parameter, select it in the list below and click “OK”.

Now select the “Seawater” parameter in the list and “drag and drop” it with the mouse into the Report Parameter group.
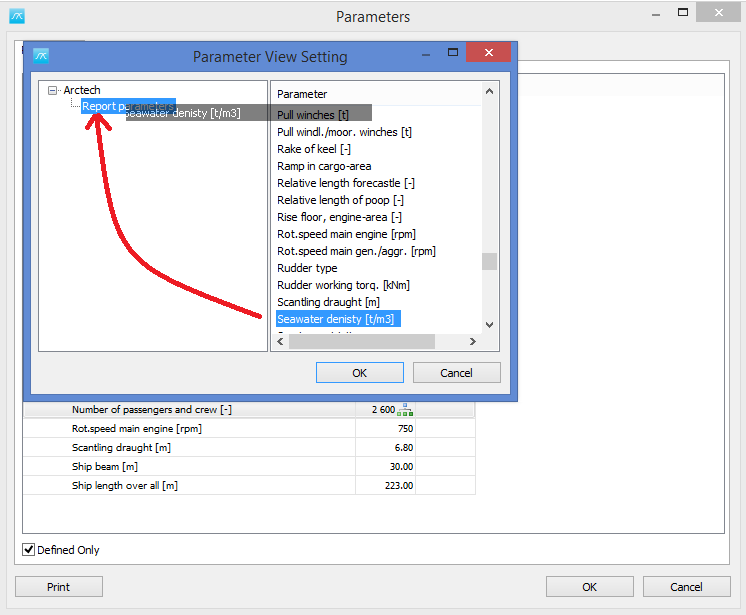
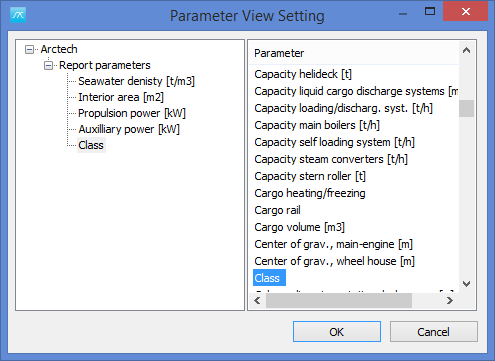
Repeat for the other parameters. End result should look like this:
Note: On some computers we have a bug reported that the entire list of parameters to the right turns blue. This is an inconvenience that we are working to fix, however, it does not prohibit to use this function, everything works - it is mere an esthetic issue. If you experience this we apologize for the inconvenience.
Close the all windows and reopen the parameter window and you should find your new view with the parameter. Make sure the “Defined only” box is unchecked – or else you will not see the parameters. Defined only means only parameter that already have values attached.
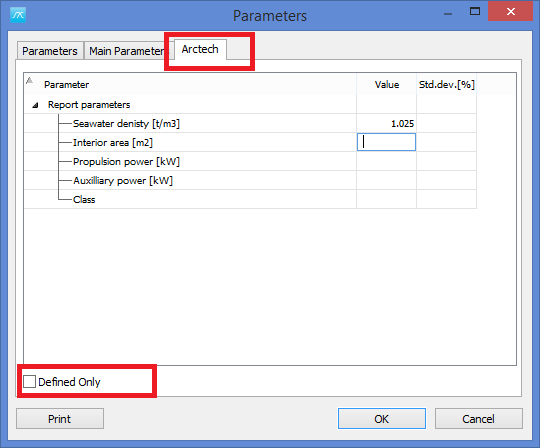
Fill in the parameter values in the new tabsheet.
Step 11: How to Edit Estimation Methods in ShipWeight
Go to menu Database->Administrator->Method Definitions… and open the window for editing/adding estimation methods.

You can navigate through the weight groups in the WBS in the tree to the left in the window. When selecting a weight group in the tree, the user defined method (estimation formula) for this weight group will be shown in the grid to the right.
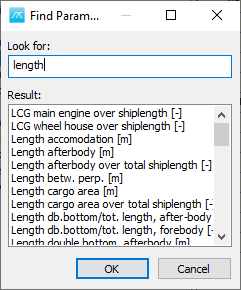
Here you can change estimation, plot and comparison parameters. You select the parameters by clicking in the grid with the parameter name. This will open a dropdown list from where you can select the parameter of choice. Notice the first item in the list - <Search…>. A double- click on this will open up a search window that helps you find the parameter you are looking for. Select <Search…> and press ENTER to open the window and start typing in the keyword for the parameter.
In addition to change parameters, you can also delete parameters, or add new ones.
Step 12: How to Paste a Method table into ShipWeight
Open ShipWeight, and go to menu Database->Administrator->System databases.
Select appropriate WBS in the list and click the Edit button.
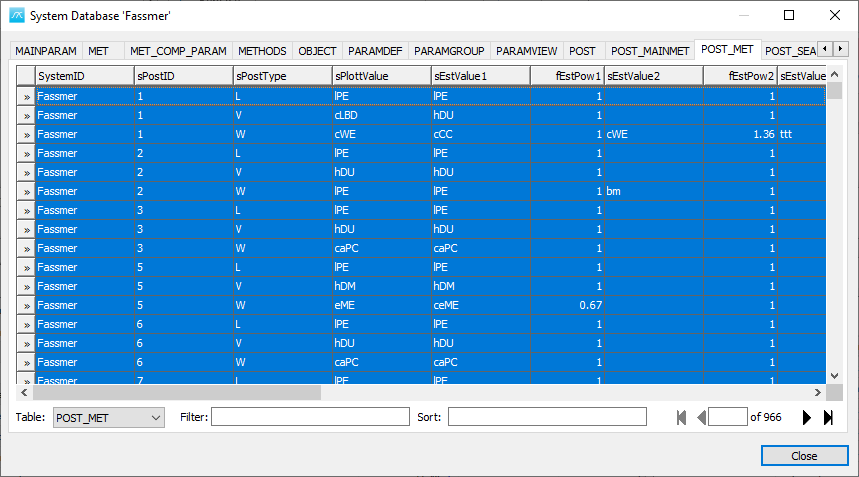
Select the POST_MET table in the window that pops up.
If there are any data in this POST_MET table, delete this (right-click the table, select “Select all” from submenu, then rightclick again and select “Delete” from submenu)
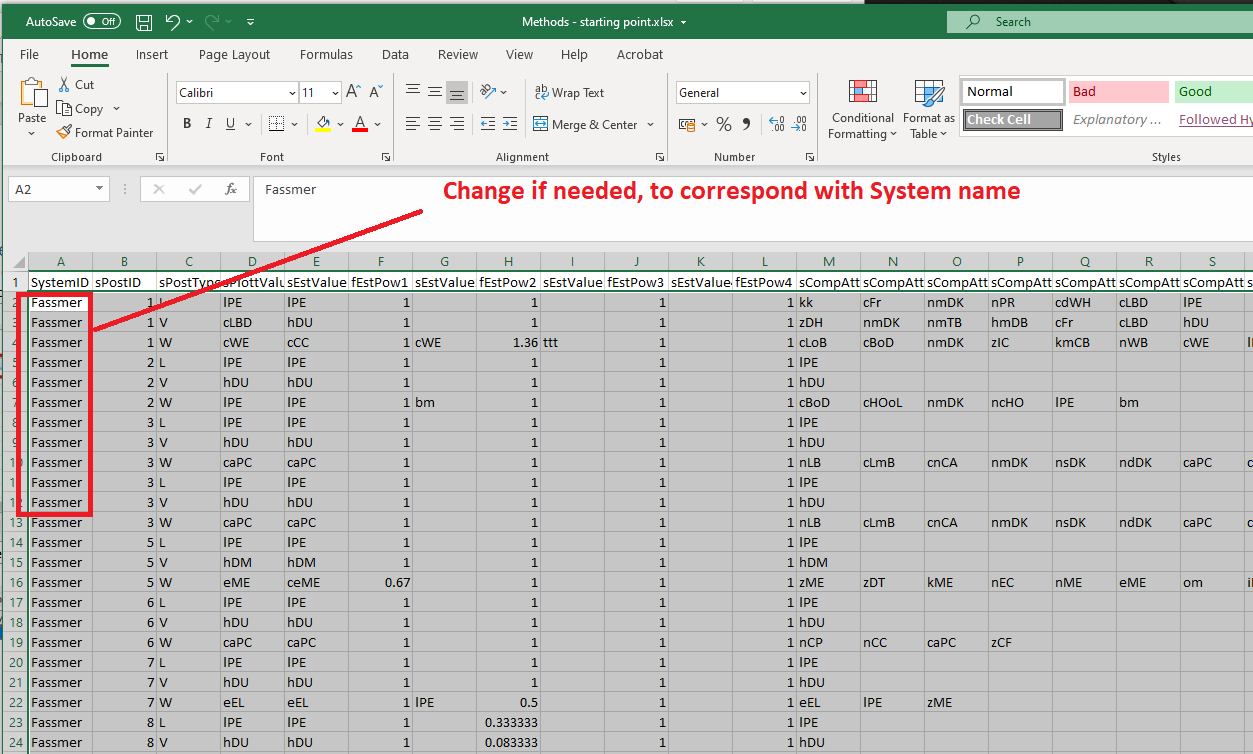
Open the Excel file with the POST_MET data. Make sure that the SystemID in the first column has the same name as the system ID that was picked in the window in point 2 above. Change if needed. Select all except header row in the sheet and copy it.
Paste into the POST_MET table in ShipWeight.
Close and restart ShipWeight.