Use Export to Master/Subprojects to split a single project into construction-unit subprojects and a master project linked to those subprojects. Open Project > Export > Master/Subprojects... The command requires WgtInfo Export permission.
The export uses all saved physical items belonging to the source project. Filters and row selections in the Items window do not limit it. The source must be a single project without active subprojects, and every item must be assigned to a valid export group through the selected custom code.
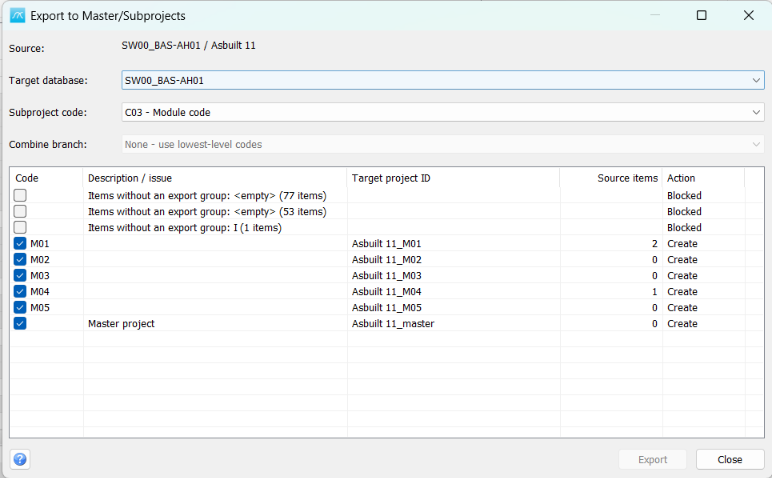
Select the destination and grouping
Source: Shows the current source database and project. Check this before preparing the export.
Target database: Select an existing writable database on the same server and with the same system prefix. The current database can also be used. The command does not create a database or migrate the project to another system; the destination schema must be compatible.
Subproject code: Choose the custom code type that identifies the construction units. The list contains defined C01-C99 code types, with their titles. Choose the code by its meaning in this project, not by assuming a particular code number is always used.
Combine branch: With None - use lowest-level codes, each leaf code defines a subproject. Select a parent branch to combine that branch and all its descendants into one subproject; leaf codes outside the selected branch still form separate subprojects. Original item code values are preserved.
For source project P100 and leaf codes A and B, the proposed projects are P100_master, P100_A and P100_B. The master is linked to the subprojects. Check the exact names shown in the list; project IDs must fit the permitted length and must not collide.
Review the export plan
Automatic update: The list updates automatically after you select a target database and subproject code, and whenever the database, code or combined branch changes. The source items, grouping and destination projects are validated without exporting. The table shows Code, Description / issue, Target project ID, Source items and Action. The previous plan is cleared immediately when a selection changes, and Export remains disabled until the new plan is valid. There is no separate Preview button.
Create: A new target project. It is selected by default. Clear its checkbox to skip creating it.
Update: An existing target project that can be updated. Existing subprojects are initially left unselected; tick only those you intend to update. The master is selected and must remain selected to maintain the planned links.
Keep / Skip: An unchecked existing project is kept unchanged; an unchecked new project is skipped. The master links are built according to the validated plan, including the existing projects retained by it.
Blocked: A reported issue prevents that target from being processed. Inspect the Description / issue column. Missing or unmapped item codes, invalid project IDs, incompatible destination data or conflicts with existing targets may need correction. The master and general source issues can block the whole export. Correct the cause and change or reselect the relevant database, code or branch to update the plan.
Ticking a valid row in the export plan changes its action between Create and Skip, or Update and Keep. The checkboxes determine which target projects are processed; highlighting a row alone does not select it for export.
Export and follow-up
Export: Execute the checked create/update operations using the validated plan. The command revalidates the plan before writing. It copies the relevant project setup and the items assigned to each subproject, and creates or updates the master links. Existing targets are updated only where the export supports a compatible update; local-only code fields and established parameter values are preserved.
New construction-unit projects do not inherit the source project totals, parameter values, logs, worksets or instances as a completed calculated project. Establish the appropriate parameter values separately for each construction unit.
When export completes, read the completion message and open the master project. Summarize the item weights and subprojects to calculate stored totals, then verify the subproject contents and the master total. Recalculate and check these values before exporting to the historical database.
Close: Close without starting the export and remember the target database, subproject code and combined branch for the next time the window opens. Click the X in the title bar or press Esc to close without saving changes to these selections. During export, the command buttons are disabled until processing finishes.
Help: Open this topic. F1 opens the same page.