Upon launching ShipWeight, the Login window will appear. The Authentication and SQL Server fields are typically pre-filled and rarely need adjustment.
For initial setup, use the following credentials:
User name: Administrator
Password: admin
Next, select the system breakdown structure from the System dropdown list and click OK to proceed. This will open the Main window of ShipWeight.
Previous User Name and System settings will be retained from the previous session for your convenience.


Main Window Overview
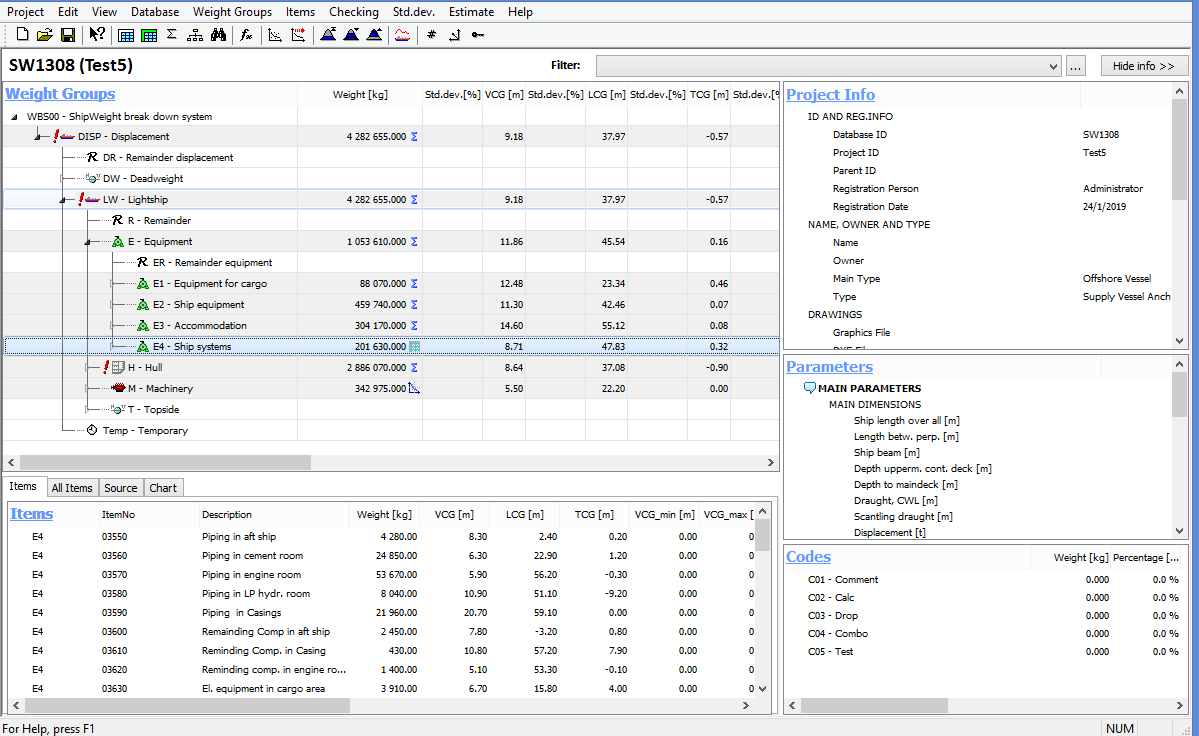
The first window you encounter is the Main window. Below, you'll find a detailed overview of its various components.
At the top of this window you find the main menu and the icon based quick menu.
Left Pane Overview:
In the left section of the main window, you'll encounter two crucial views: Weight Groups and Items/Source. These views are designed to enhance your navigation experience and provide comprehensive information about the project's weight distribution.
1. Weight Groups view (Upper Left):
This section seamlessly combines the weight group hierarchy with grid tables for an intuitive exploration of the project's weight structure. Unlike conventional setups, there's no limitation to the number of weight groups displayed on the same level of the structure.
![]()
Icons within this view provide valuable information about the source of the weight group summary:
- A Grid table icon ![]() indicates that the weight group is a summary of weight items.
indicates that the weight group is a summary of weight items.
- A Sigma icon ![]() indicates that the value is a sum of subgroups, not individual items.
indicates that the value is a sum of subgroups, not individual items.
- Finally, a Graph icon ![]() indicate that the value is estimated using a parametric formula.
indicate that the value is estimated using a parametric formula.
Clicking the Grid table and Graph icons are opens the Items and Estimation window, respectively.
Each weight group is represented by an icon corresponding to its type, including:
|
Remainder |
|
Deadweight |
|
Lightship / Lightweight |
|
Machinery |
|
Hull |
|
Equipment |
|
Temporary |
You have the flexibility to expand or collapse the structure to reveal more or less information. This can be accomplished using the arrows next to the weight group name or through the expand/collapse options in the right-click menu.
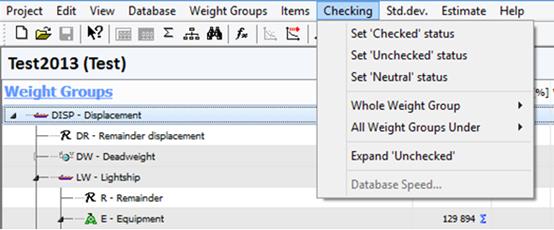
Additionally, each weight group can be assigned a status: Checked, Unchecked, or Neutral, represented by the respective icons.
|
Checked |
|
Unchecked |
|
(No icon) Neutral |
To set the status, select one of the options from the Checking menu or use the Right-Click menu.

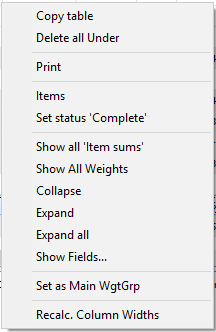
The Right-Click menu in this view offers the following options:
- Copy Table
- Delete
- Print
- Open Items window or Estimate window for a weight group
- Set Status
- Adjust Totals
- Log Values
- Collapse/Expand Structure
- Show Fields
- Optimize Column Width
- Select Main Weight Group.
2. Item and Source Window (Lower Left):
Beneath the Weight Groups view, you'll find the Item and Source view. This section is subdivided into four subviews:
a. Items:
Displays the items corresponding to the selected weight group in the Weight Groups view.
b. All Items:
Provides an overview of all items associated with this project.
- Right-click options for the first two views are:
- Copy Table
- Edit Items ( Open the Items window)
- Prin
- Show Fields
- Optimize Columns Width
- Turn On/Off Autosum Weight Groups.
c. Source:
Displays the weight and center of gravity for the selected weight group in the Weight Groups view. Offers various sources such as Not defined, Subjective, Estimate, Items, Percentage, and Summarize. This allows you to choose which source to display in the Weight Groups view for the selected weight group. Right-click options in this view include Delete Source Value, Copy Source CoG Values, and Copy Source Min-Max Values.
d. Chart:
Presents the total weight of the selected weight group in the Weight Groups view as a pie chart, with each subgroup represented by a slice proportional to its respective weight within the group.
This comprehensive left pane provides vital insights into the project's weight distribution and allows for efficient navigation and management.
Right Pane Overview:
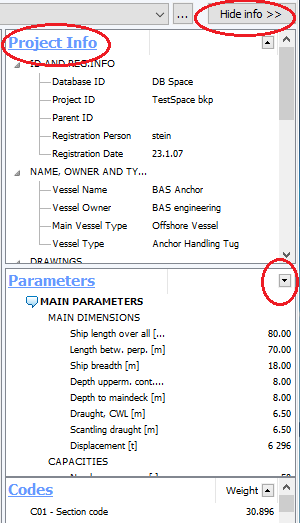
In the right section of the main window, you'll find three distinct information windows: Project Info, Parameters, and Codes. Each of these views comes with an extended submenu, accessible by right-clicking the mouse button. This submenu offers a range of options, including expanding and collapsing weight groups, adjusting column widths, and copying information to the clipboard. Below, you'll find detailed descriptions of each view and the associated options available in the right-click menu.

1. Project Information (Upper Right):
- This section displays comprehensive Project Information, encompassing details such as Database ID, Project ID, Parent ID, Registration Person, Registration Date, Name, Owner, Type, and Subtype.
- Use the arrows within the view to toggle the visibility of the Main topics: Database and Project ID and Reg. Info, Name, Owner and Type, Drawings, Design and Yard, and Coordinate system.
- The right-click menu in this view provides the following options:
- Copy table: Copy the selection that is shown in the view per now.
- Edit Project Info: Open the Project Info window for editing.
- Print: Generate a Project Info Report with the content stored in the Project Info window.
- Expand All: Show all Main topics and their content.
- Collapse All: Collapse all the Main topics and their content.
2. Parameter View (Center Right):
- This view presents the main parameters.
- The right-click menu in this view offers the following options:
- Copy Table. Copy the selection that is shown in the view per now.
- Edit Parameters: Open the Parameter window.
- Estimate: Estimate parameters.
- Update: Update parameter values.
- Print: Generate a report based on current parameters.
- Expand/Collapse All Parameter Groups: Toggle visibility of parameter groups.
3. Codes View (Lower Right):
- This section displays Weight and Percentage values for defined Codes.
- The right-click menu in this view provides the following options:
- Copy Table: Copy the selection that is shown in the view per now.
- Edit Codes: Open the Code definition window.
- Print: Create a report based on current code information.
- Expand/Collapse All: Toggle visibility of code sections.
- Add Correction
- Open Code Summary Window: Access a summary window for code details.
- Update Values: Update code values.
You can hide or show these views by clicking on the Show/Hide button (small arrow) to the right in the heading. Additionally, the heading title itself is clickable and functions as a hyperlink to open windows for editing the information in the area. For maximizing space dedicated to the weight group hierarchy, you can hide the entire area by clicking the "Hide info >>" button.

Please note that in the Codes window, a summary of the weight per code is displayed. For very large projects, this feature may potentially impact speed. To address this, there is an option in the Options window to disable this summation.
