In this section the following will be shown:
•Making the Weight Distribution Curve
•Calculation of Inertia and Radius of Gyration
Step 1: Open a Project with Weight Data
Open a previous project that has weight data.
Step 2: Check the LCG_min and LCG_max Values
To get a good distribution curve it is a big advantage if you have the starting point and ending point of your weight items. Basically you should have the LCG, and the LCG_min, LCG_max values for each item to get a good weight distribution curve.

Step 3: Set Default Extent for Items without Extent Data
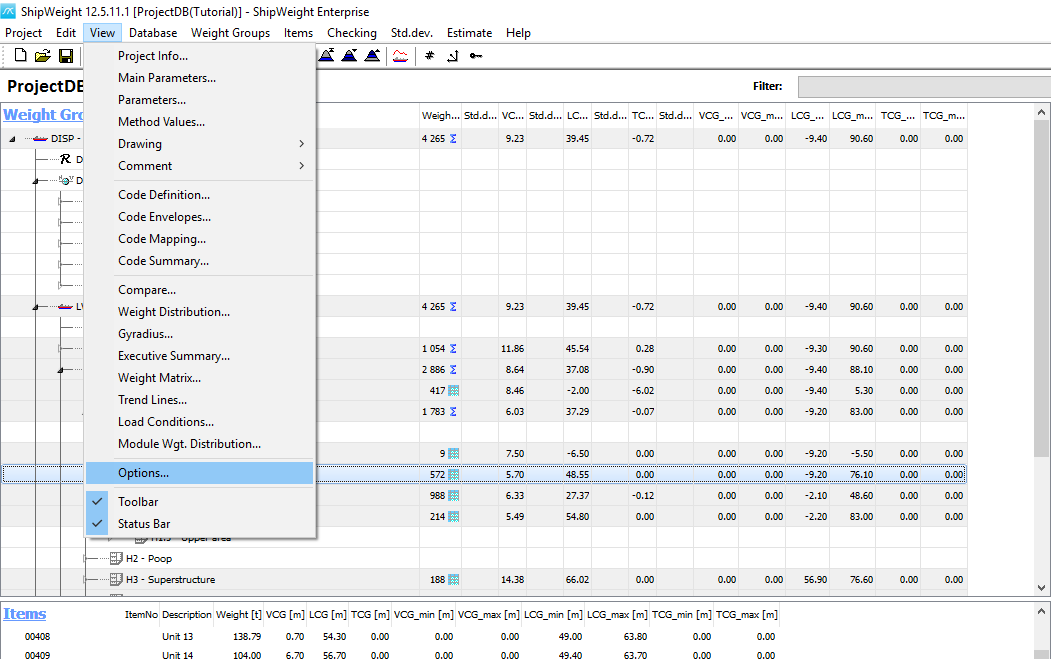
However if there are some items who do not have extensions, default extensions can be set to be used for those. To do this go to View menu and select Options:
The Options window will pop up:

Change the default Extent from 0 to 2 and min. from 0.01 to 0.5 meters:
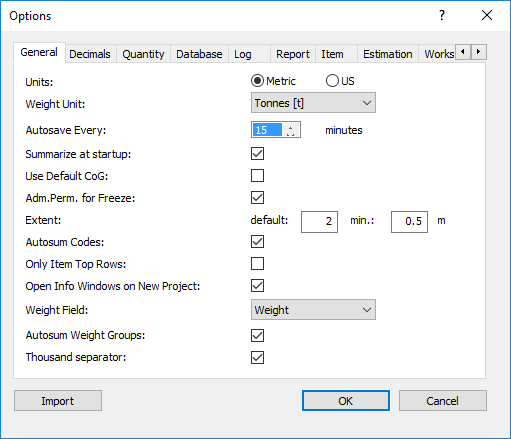
And then click OK.
Step 4: Open the Weight Distribution Window
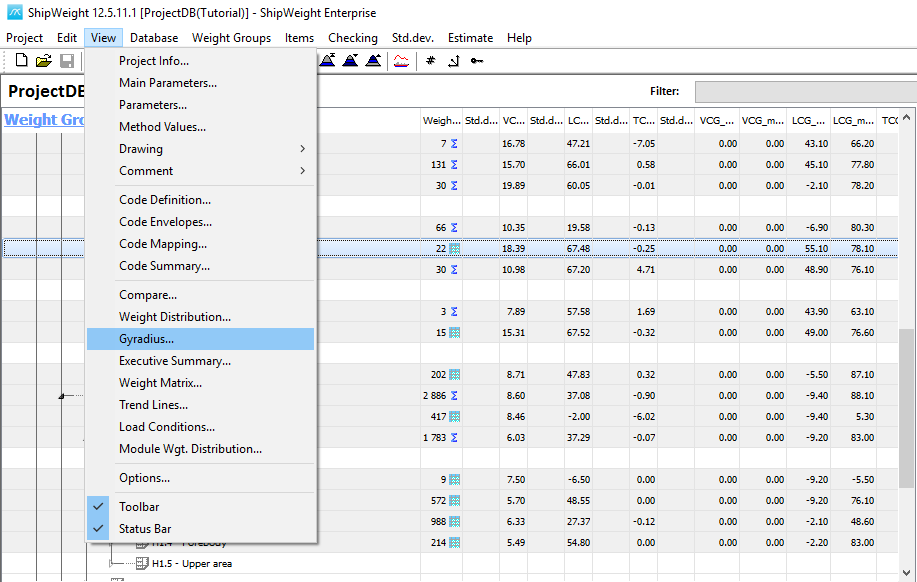
Now, to open the weight distribution window go to View menu, and select Weight Distribution…:
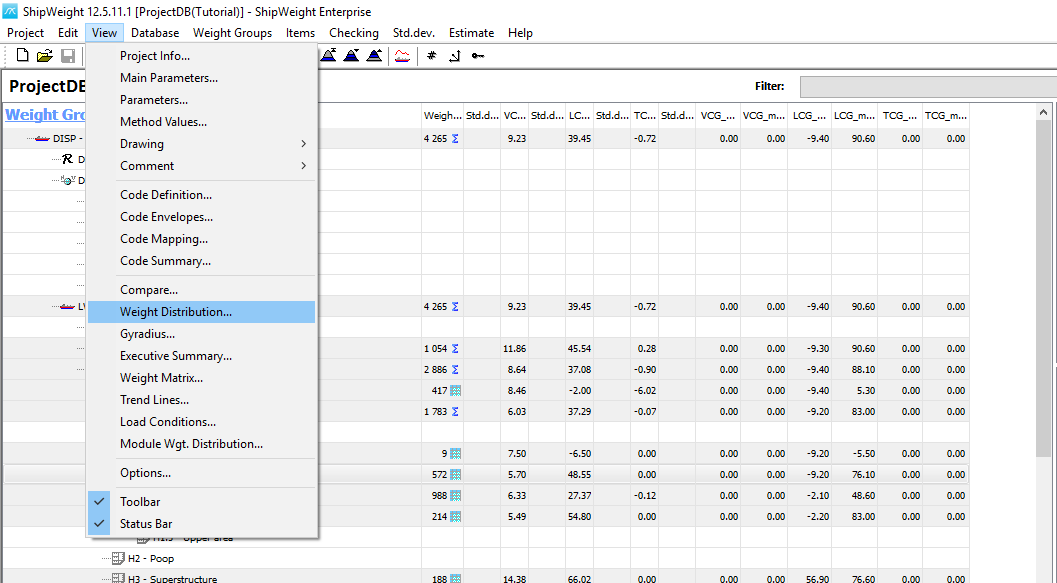
Or the shortcut from the toolbar ![]() .
.
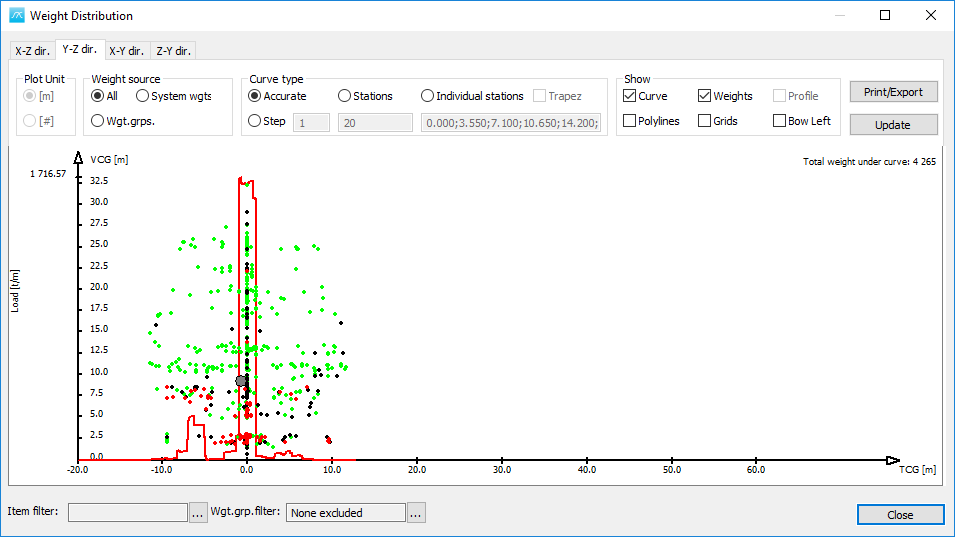
Then the Weight Distribution is opened for the vessel:
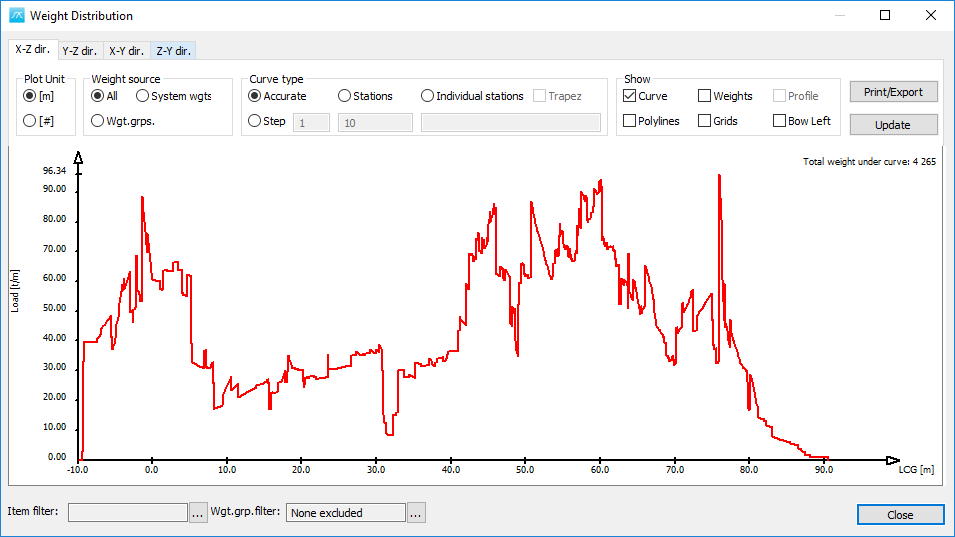
By default we are looking at Accurate weight distribution curve type, and to see the data behind the curve you can enable the plotting of the Weights option:

The center of gravity location for each weight in the database is plotted. The black dots represent the steel weights, the green dots for equipment weights, and the red dots for machinery weights.
To check the weight data for any dot, click and hold on the specific dot:
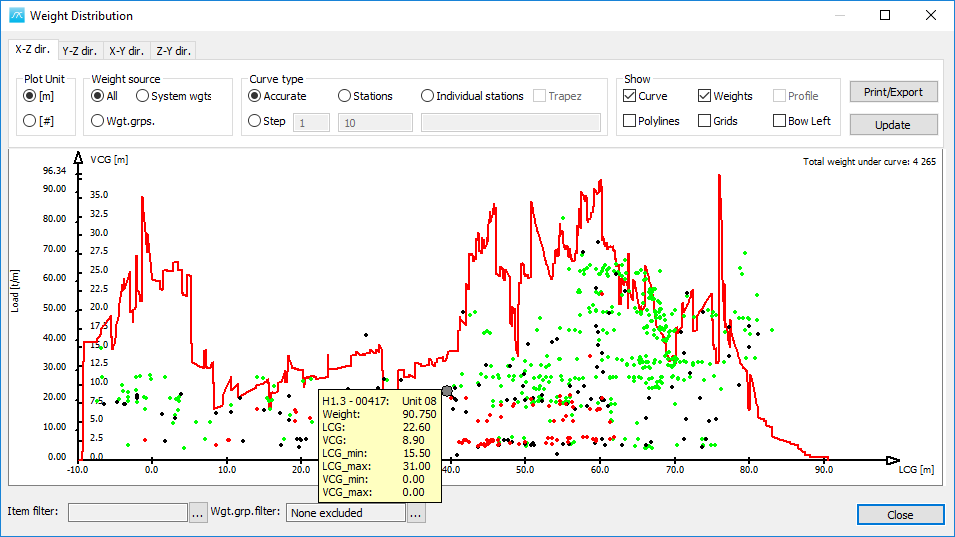
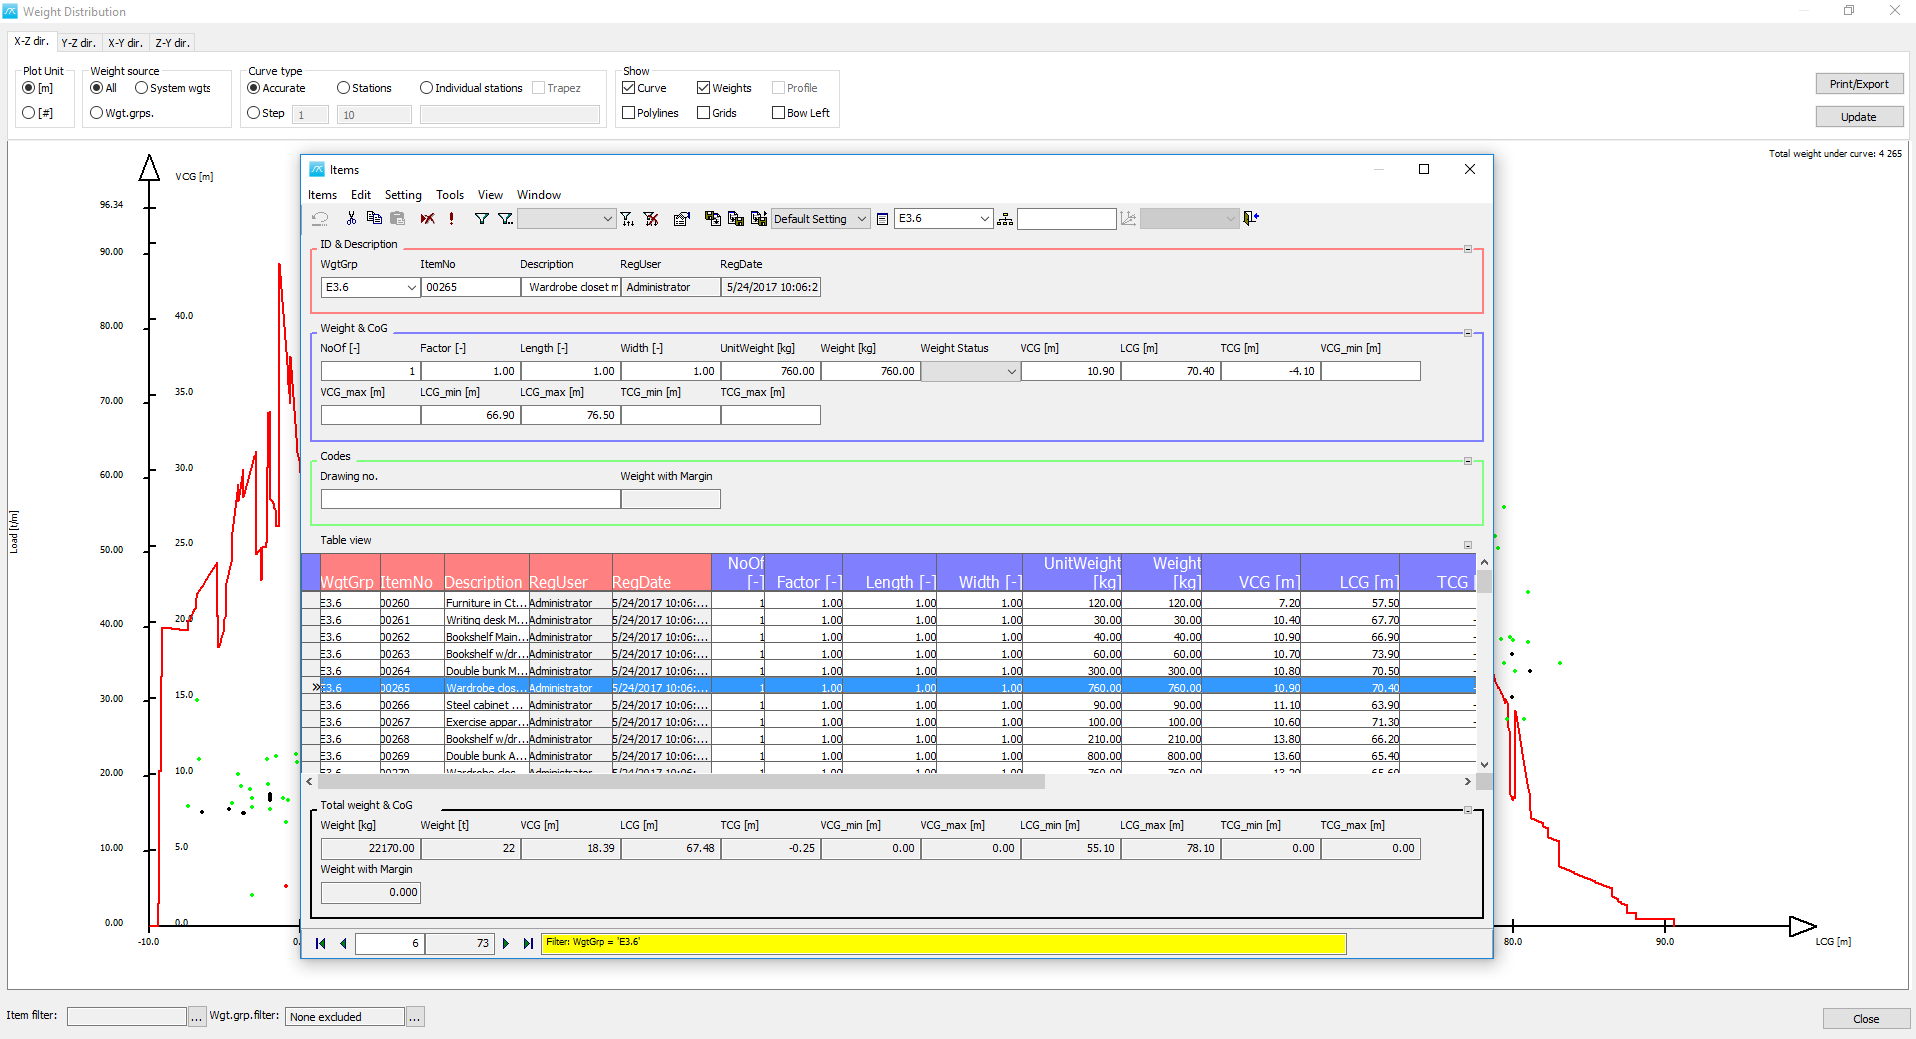
In this way you an check suspicious looking items. If you find some items which are not correct, the double click on the point and it will bring up the Items window, and finds that item for you and allows you to change that item:
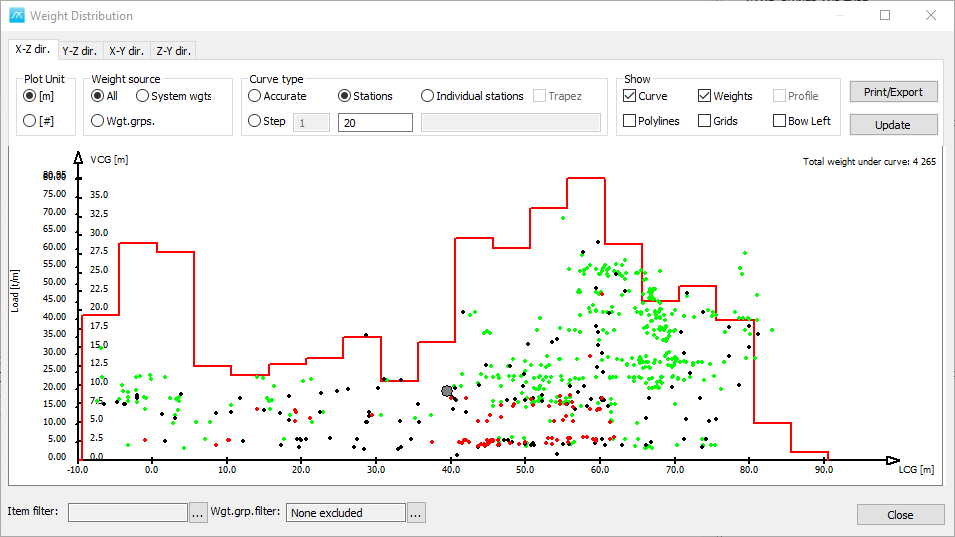
Step 6. Transform the Curve to a Given Number of Stations
Now in addition to get this accurate curve, you can also select Stations curve type and type in 20 stations curve:
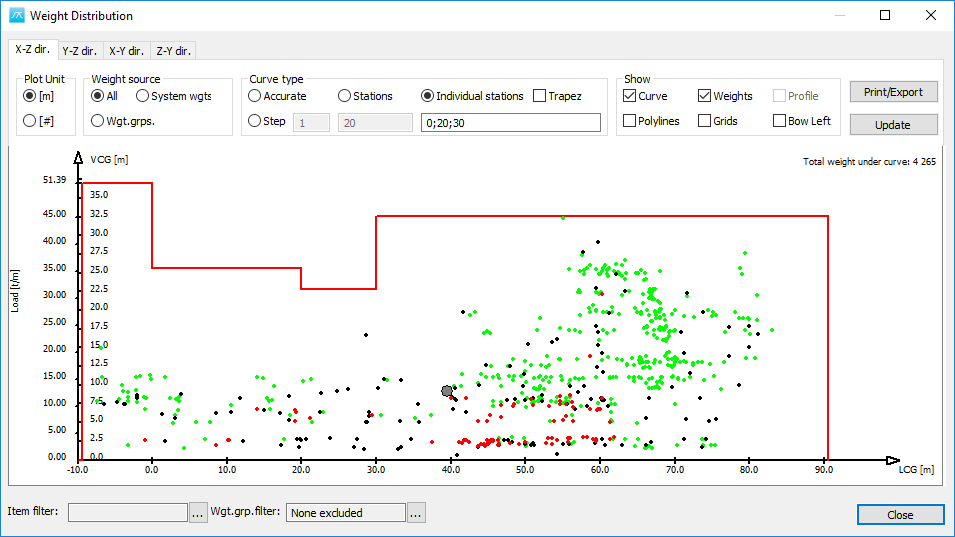
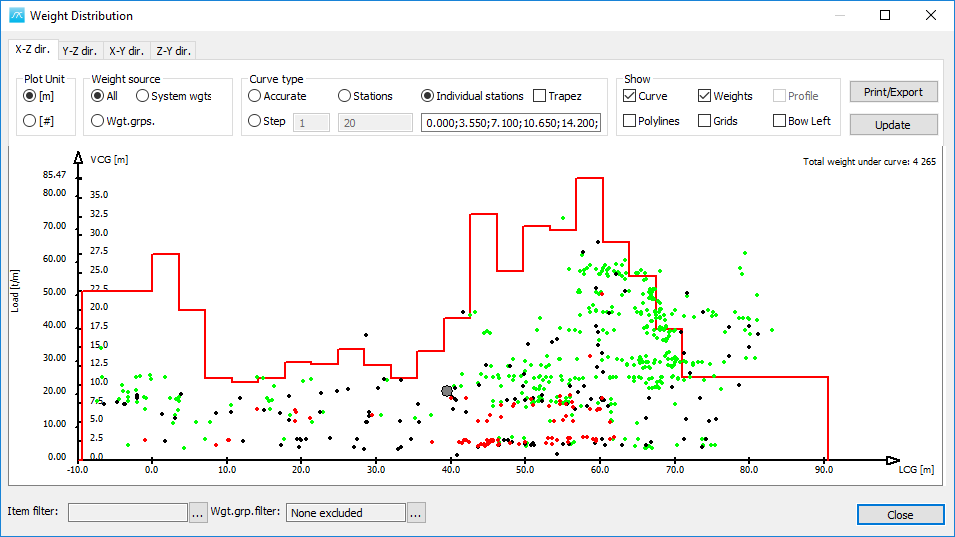
You can also do Individual stations curve type, and by typing the numbers and points 0;20;30 where you want to see the various stations:
Step 7: Create a SAWE Curve (Individual Stations)
You can also right click and select Create SAWE stations:
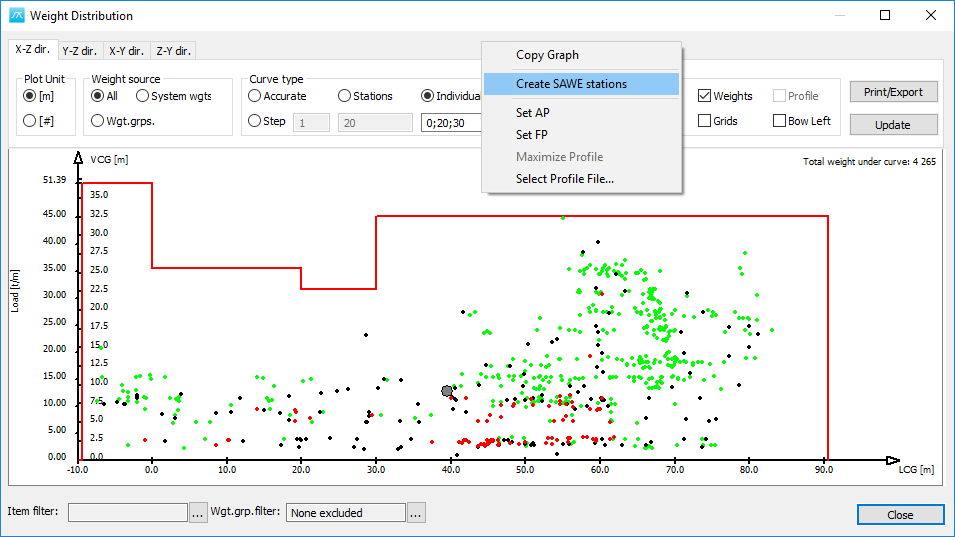
Which will be default give 20 stations between AP and FP and then 1 station in front of FP and 1 station behind the AP:

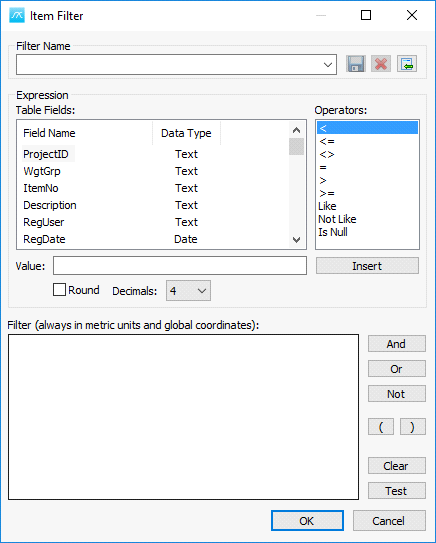
In addition, there is also the Item Filter, can be opened from the Item filter ![]() browse button in the lower left corner of the Weight distribution window:
browse button in the lower left corner of the Weight distribution window:
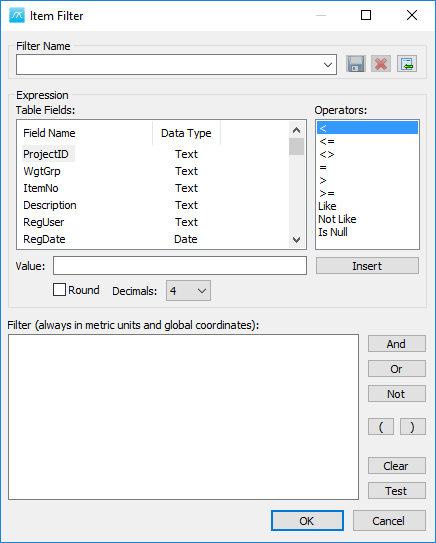
And you can set any filter you want, WgtGrp, ItemNo, Description, etc.
Step 8: Export the Curve to a Stability Software Format
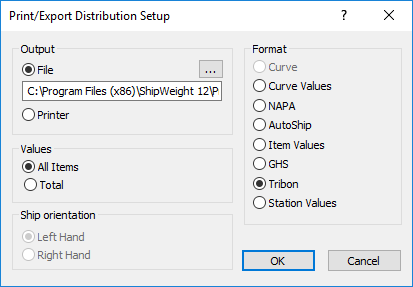
If everything looks ok with the curve, you can go and export the weight distribution curve by using the Print/Export button:
The Print/Export Distribution Setup window pops up and you can select the desired Format to get formats that are suitable for import to this stability software for doing longitudinal strength calculations:
Step 9: Check the Curve in Other Directions
Finally, the user should know that not only the longitudinal extent (X-Z dir.), but also other directions to look at the curve are available. For example in the Y-Z direction, go to the tab sheet Y-Z dir., and it will show the distribution curve over the beam of the vessel:
Step 10: Calculate Moment of Inertia and Gyradius
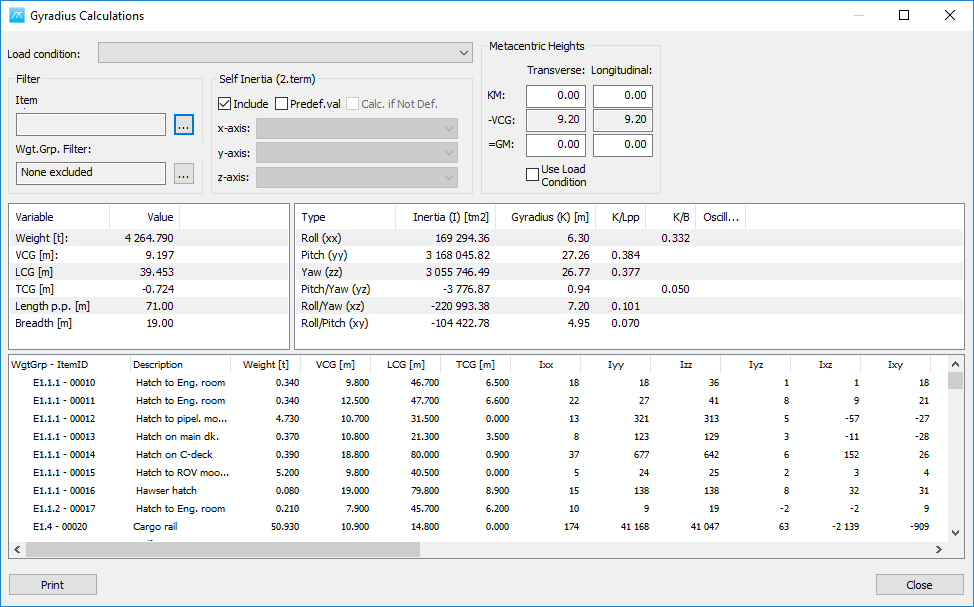
Open the Gyradius Window from the menu View->Gyradius…
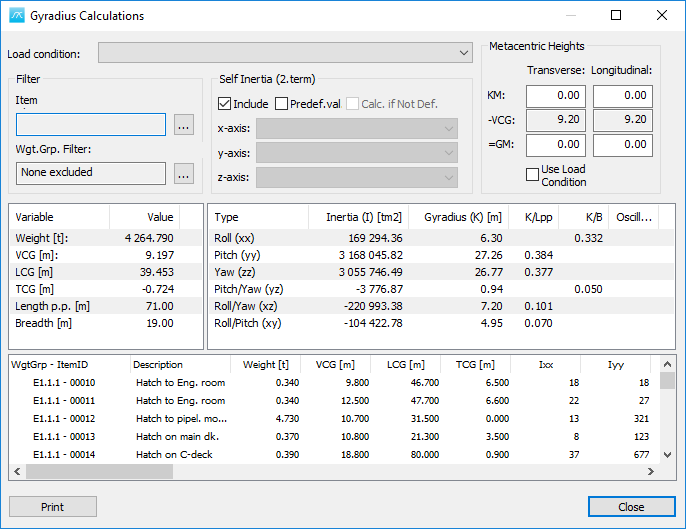
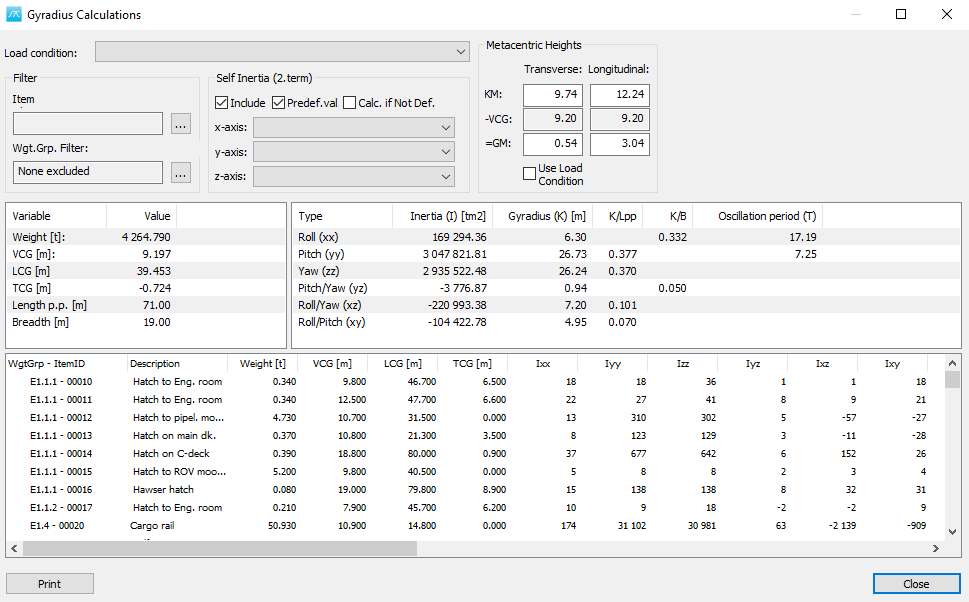
This brings up calculation for gyradius and moment of inertia for the vessel:
Step 11: Apply Any Necessary Filters
Here we can apply Item filters:

Step 12: Get the Main Moment of Inertia and Gyradius
Now it is calculating Moment of Inertia and Gyradius values for Roll, Pitch, Yaw, and also for the product of inertia Pitch/Yaw, Roll/Yaw, Roll/Pitch:
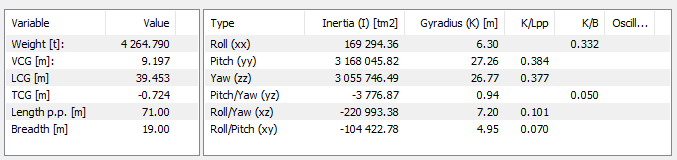
Here you can find details for each individual item:
The way ShipWeight is calculating:
The Moment of Inertia by taking the Transverse inertia using the Steiner’s theorem or parallel axis theory and that it’s done for all items. If there is an item that has extents in all three directions then the item will be approximated to a box and also calculate the local inertia for that particular item.
It is also possible to point to custom codes which can have exact values for the moment of inertia stored in the custom codes if you can get such values from the CAD software.
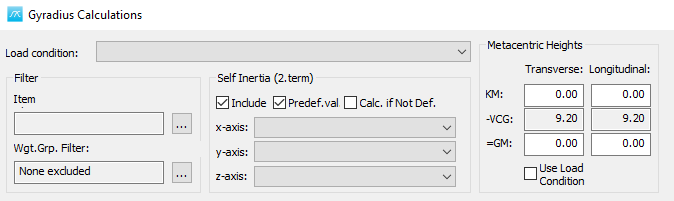
Finally, if the GM values for transverse and longitudinal are known from the stability software. So let’s type in some values:
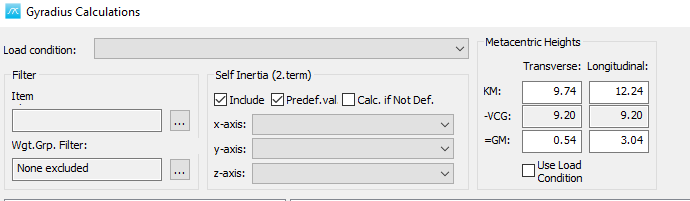
Step 13: Calculate the Oscillation Period
Also based on this we can calculate the Oscillation period (T):
Step 14: Export Data to Excel and/or text files
Export is done in the same window as the “Import Data Window”, but by selecting the tabs “Export” and “Export Excel”. Proper settings must be set for the export options and a saved mapping must be used to define the export.
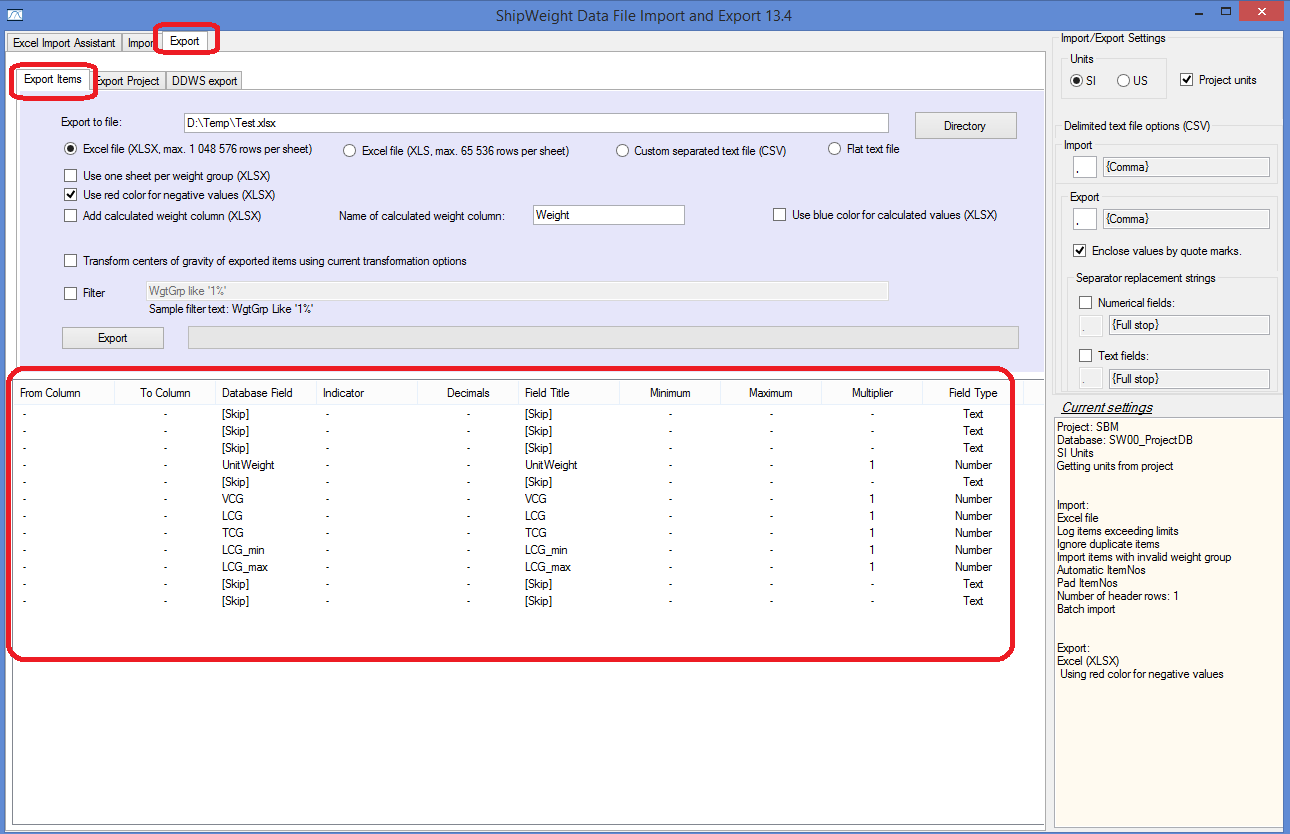
If you do not have a saved mapping, the mapping must be created manually. This is how to to it:
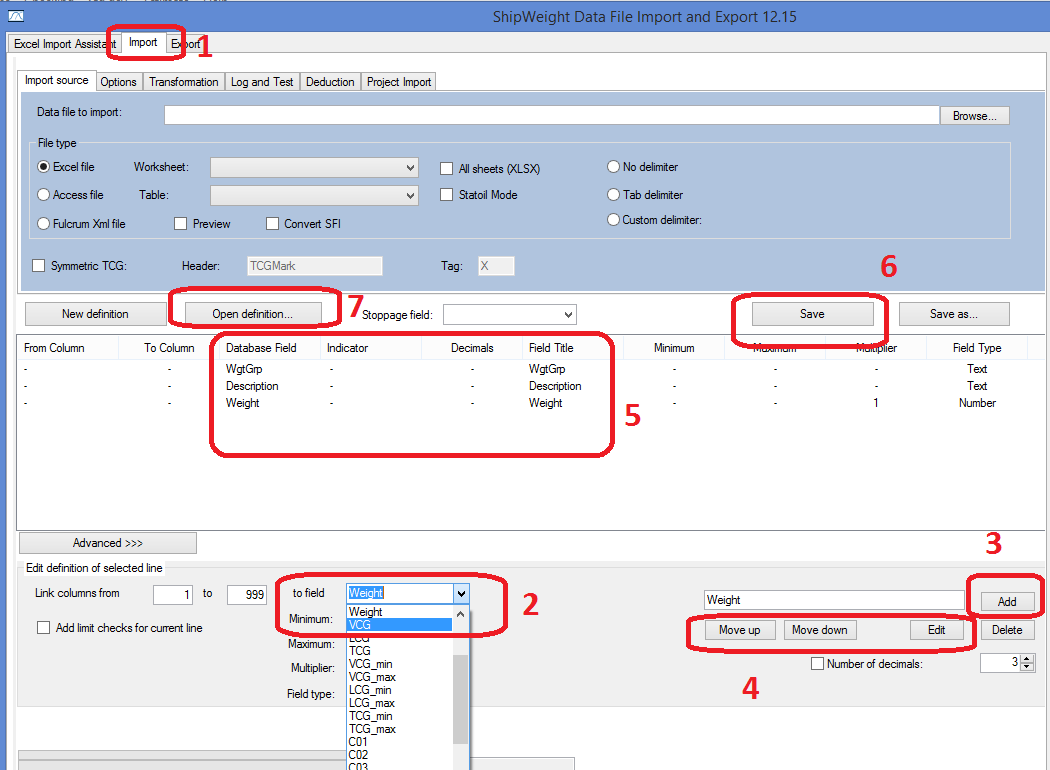
Steps (see numbers in red in picture):
1.Go to Import tabsheet
2.Select the first column you want to export in the droplist
3.Click the Add button to add to export mapping. Repeat step 2 until all columns you want to export has been selected.
4.If you want to change the order of columns, select a row in 5 and use buttons Move up and Move down as needed (only if you need to change order)
5.This displays your export columns.
6.If you want to you can save the mapping by pushing button Save (not necessary to do the export)
7.If you have already saved a mapping, you can open it from this button.
This method of export is the fastest and should be used if you have many thousand items to export. If the number of items are not so many, you may use alternative method, see next page:
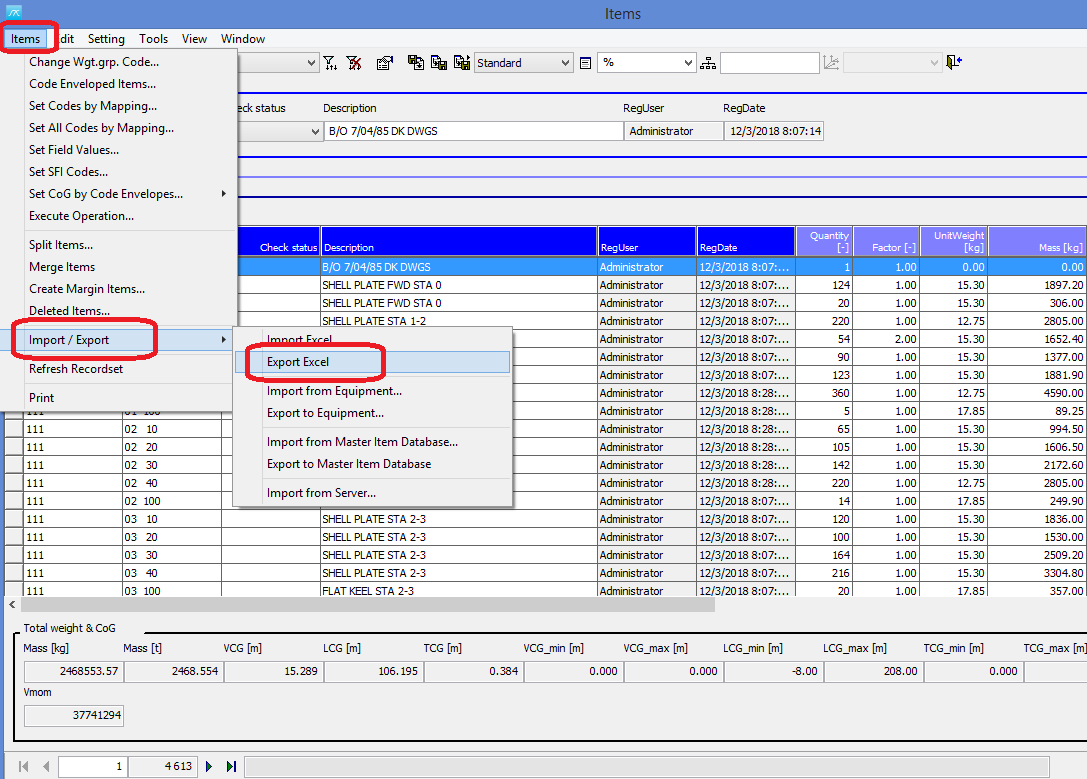
Alternative method if number of items is not too many:
Export from the Item Window in ShipWeight, menu Items->Import/Export->Export Excel, see picture below.
This will export the items in the table view in the Item Window.
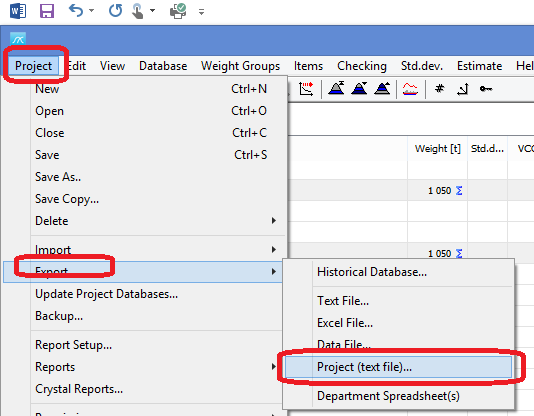
Step 15: Create Backups of Your Projects
Create a text file backup of a single project by going to the menu Project->Export->Project (text file).
You can restore the file by going to the corresponding menu item in the Project->Import menu,
Backup and restore of the complete database can be done by going to the menu “Project->Backup”. Note that this backup will only work if you have backup permissions on the SQL Server.