Administration and Customization
Use Dashboard Setup to define sections and tabs for the main window. A dashboard consists of sections placed in layout areas, with one or more elements in each section. Open View > Dashboard Setup. This command is available to system administrators. Editing the section and element tables requires Setting Edit permission.
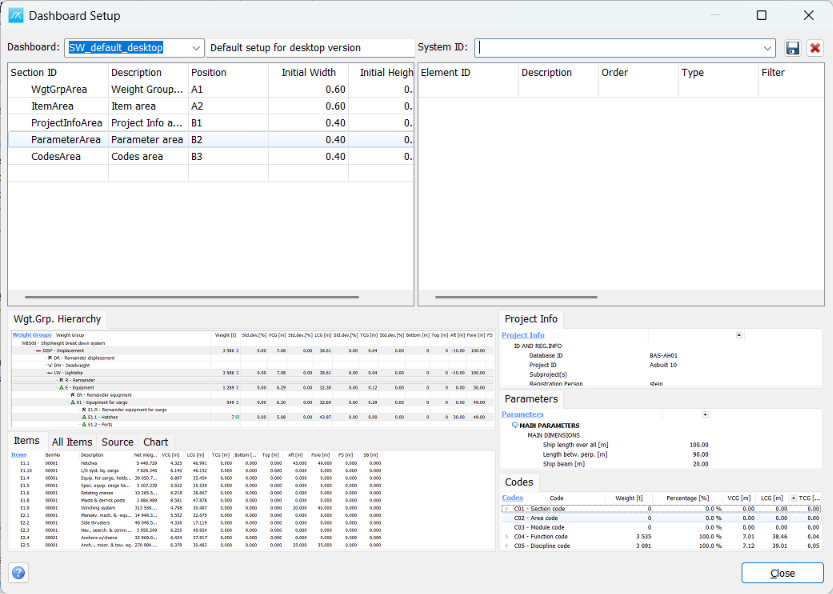
Choose or create a setup
Dashboard: Select an existing dashboard ID to edit its definition. To create a variant, load a suitable setup, enter a new dashboard ID, change the description and click Save. Use distinct IDs so that existing setups remain available.
Description: Enter a descriptive name for the setup. System ID: Select the system associated with the definition, where required. Definitions are stored in the system database and can be shared by projects using that database.
Selecting a dashboard here selects the definition to edit. To use it as the active dashboard, select the appropriate desktop or web dashboard under Options > Layout. The desktop and web selections are separate.
Define the sections
The upper-left table lists the sections. Select a section to display its elements in the upper-right table. Use the empty row to add a definition and finish the cell edit before moving on.
Section ID: Unique identifier for a section within this dashboard. Description: Descriptive section name. Position: Choose A1, A2, B1, B2 or B3. A1 and A2 are the upper and lower areas on the left; B1, B2 and B3 are the upper, middle and lower areas on the right.
Initial Width and Initial Height: Relative layout proportions, entered as fractions rather than percentages. For example, 0.6 means 60% and 0.5 means 50%. These fields determine the initial split positions; they are not pixel sizes. Keep proportions for areas sharing a column consistent and inspect the preview.
The standard desktop layout places the weight-group area in A1, the item area in A2, project information in B1, parameters in B2 and code summary in B3. Start from this arrangement when creating a desktop variant.
Define the elements and tabs
Element ID: Unique identifier within the selected section. Description: The name displayed on its tab. Order: The order of the elements within the section. Use distinct order values to avoid ambiguous tab selection.
Type: Select the content type. The list includes WgtGrpTree, WgtGrpMatrix, SubprojectMatrix, Items, WgtGrpSource, WgtGrpChart, ProjectInfo, Parameters, CodeSummary, Trendline, Comment and Info. Availability and behaviour depend on the target application and layout area; the preview is not a guarantee that every type can be used in every position.
Filter, Setting 01 and Setting 02 are advanced element-specific settings. Their meaning depends on the content type and application. Keep the values from a working setup unless you know which values the element expects. They are not interchangeable with the global item filter. For weight-group area tabs, Setting 01 can identify the associated weight-group display setting.
Preview and table commands
The lower area previews the section positions, tabs and content types. Select a tab to inspect that element. The content images are illustrations, not a live display of the current project. Drag the dividers to give the editing tables or preview more space; use the section fields to specify stored initial layout proportions.
The section and element right-click menus offer Copy, Paste, Delete and Select All. Check which table is active before using these commands. Section-menu commands can recreate the default desktop or web setup; use them with care because they write default definitions to the database.
Save, delete and close
Save: Store the current dashboard, sections and elements. Save after finishing cell edits. Delete: Remove the selected dashboard definition. Avoid deleting a setup that is still selected for use under Options > Layout.
Close: Close the editor. When the setup has unsaved changes, the window asks whether to save. Selecting another dashboard or closing with the window close control can also prompt to save. Save explicitly when you want to keep your changes.
Help: Open this topic. F1 opens the same page.