Administration and Customization
Use Menu Setup to define named sets of commands for toolbars, ribbons and other supported user-interface areas. A setup specifies the target platform, window and interface type, together with the commands, labels, grouping and images used there. Open View > Menu Setup. This command is available to system administrators. The window can also be opened using the browse button beside User Toolbar Main window in Options > Layout.
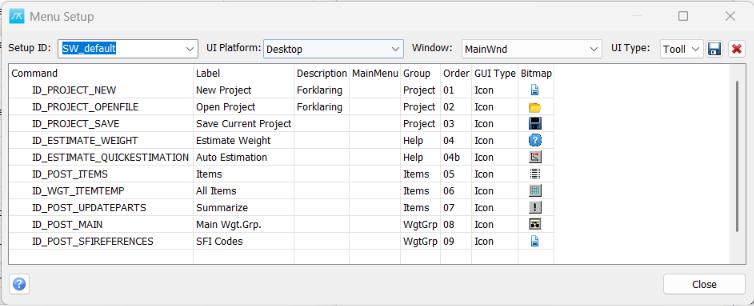
Choose or create a setup
Setup ID: Select an existing setup to edit it. To create a variant, load a suitable setup, enter a new ID, adjust the settings and save it. Keep the original available until the new setup has been tested. Definitions are stored in the system database and can be shared by projects using that database.
UI Platform: Choose Desktop or Web. Window: For Desktop, choose MainWnd, ItemWnd or EstimationWnd. For Web, Dashboard is listed. The UI Type choices depend on the selected window. Choose the platform, window and type before adding commands.
For MainWnd, UI Type includes Toolbar, Ribbon and menus associated with the weight-group, item, source, chart, project-information, parameter and code-summary areas. ItemWnd offers Toolbar and ItemTable. EstimationWnd offers Toolbar, Graph, CalcuateTable, ReferenceProjectTable and ComparisonTable. CalcuateTable is the spelling currently shown in the list.
The current editor does not offer UI Type choices for Web > Dashboard. The presence of a platform or interface type in the setup editor does not mean that every application view supports applying it. The main-window toolbar and ribbon have a separate activation setting in Options > Layout.
Define the commands
The table contains one row per command. Use the empty row to add a command and finish the cell edit before saving. Editing requires Setting Edit permission. The Command choices are read from the available command definitions for the selected window; choose an existing command rather than entering an arbitrary name.
Command: Identifier of the action to run. Label: Text displayed for the command. Description: Explanatory text associated with the command. Each command identifier is unique within a setup, so use separate commands rather than repeating the same identifier in several rows.
Main Menu: For a ribbon, this identifies the tab. Group: For a ribbon, this identifies the panel within the tab; in a toolbar, group changes create separators. Order: Controls the sequence of commands. Use consistent values and check the resulting order after saving and reloading.
GUI Type: Choose Icon, IconLarge, Label, Hybrid or HybridLarge. These select an image, a label or a combination, with large-image alternatives. The target interface determines which presentation options are supported.
Bitmap: Image associated with the command. Double-click its Bitmap cell to open the picture editor. Select or replace the image there and accept the dialog. Use an image that remains recognisable at the intended toolbar or ribbon size.
Table commands
The right-click menu offers Copy, Paste, Delete and Select All for the command list. Copy and Paste transfer tab-separated rows. Check the selected rows and the active setup before pasting or deleting. Deleting a row removes that command from this setup; it does not remove the underlying application command.
Select Image opens the picture editor for the selected command, using its Bitmap cell. Delete Image removes the selected command image. Save the setup to keep the change.
Save, activate and close
Save: Store the setup ID, platform, window, interface type and command definitions. Save explicitly after completing edits. Delete: Remove the selected setup and its command rows. Avoid deleting the setup currently selected for use.
To use a main-window toolbar or ribbon setup, select its ID beside User Toolbar Main window under Options > Layout and apply the Options changes. This list includes setups with UI Type Toolbar or Ribbon. Selecting a Setup ID in Menu Setup only loads it for editing; it does not by itself activate that setup.
Close: Close the editor. If the current setup has unsaved changes, the window asks whether to save. Selecting another setup or closing with the window close control can also prompt to save. After applying a setup, check the command labels, grouping, images and behaviour in the target window.