New Features
•Create items with Adjust total
•Include Custom Code in Main window
•Change Field Value in Main window
•General Tab - Autocalc formula values and mm and m
•Log tab - hide logbook at closing
•Estimation tab - more options
•new type: link & memo
•new fields for parameter: alias & image
•increased functionality for composite parameter
•new type: link & memo
•use alias
•show image
•Global filter
•Modular window - Change field values window
•Scalable window
•Selection set
•Weight distribution for custom code
•New export: NAPA Element definition
•Quick Wgt.grp navigation
Export Historical Database window
•Method Values window
The New Crystal Report Viewer in ShipWeight
•Selecting a report for the second time (and onwards...)
•Remove a report from the list
•Setting report parameters and run the report
•Setting default input variables for a report
•Enhanced logbook functionality
•Updates to the help functionality- Tool tips and explanatory text
•Possible to overwrite existing project
The Main window has been improved with the following functionality: adjusting totals can now create an item, Custom Codes can be selected as one of the fields shown in the Main window, there is a new edit option “Change Field Value” for the Main window - this window is the same as the Change Field Value Window used in the Items window. In the following sections it is described how to utilize these new functionalities.
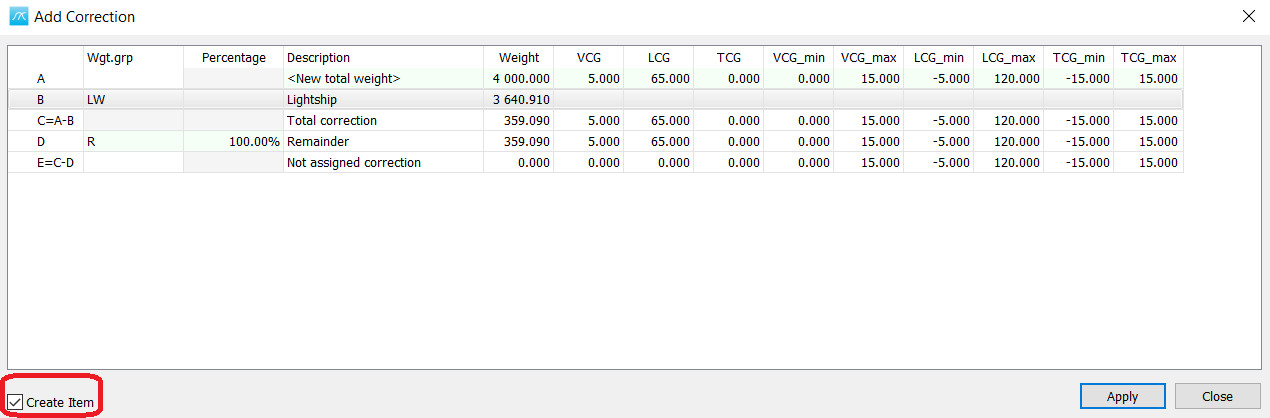
When using the adjust total function check the checkbox “Create Item” to create a new item instead of adding the adjusted weight to a cell in the Main window view.
More:
![]() Adjust Total in the Main Window
Adjust Total in the Main Window
![]() Adding a Correction Weight to Adjust a Summary
Adding a Correction Weight to Adjust a Summary
![]() New Features in ShipWeight 13.0
New Features in ShipWeight 13.0
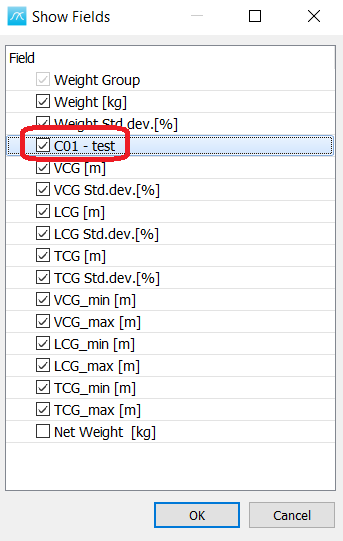
Include Custom Code in Main window
Right click in the Main window and select Show Fields. To select the Custom Code to be shown in the Main window, check the checkbox next to it. The position for the different fields is assigned by drag and drop in field list, top to bottom is shown from left to right in the Main window.
![]()
More:
![]() Set which Fields to Show and Field Order in Main Window
Set which Fields to Show and Field Order in Main Window
![]() Possible to change field order in Main Window
Possible to change field order in Main Window
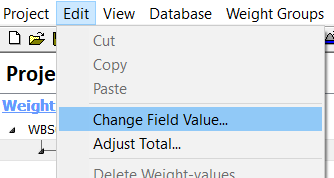
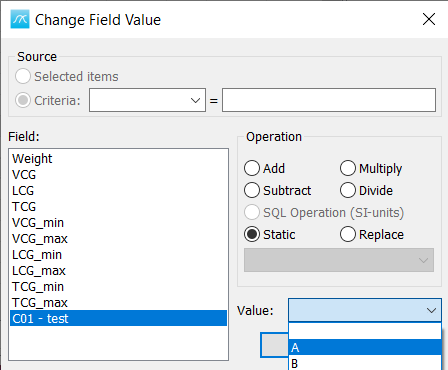
The Change Field Value window known from the Item window is now available in the Main window. Select the relevant wgt.grp. node in the wgt.grp. tree and then go to the Edit menu and select Change Field Value to open the Change Field Value Window. Select which field to change and which operation to be done and then the value that corresponds to the operation you would like to do.
More:
![]() Change Field Value in Item Window
Change Field Value in Item Window
There have been assigned many new options in ShipWeight. Use the Options window to configure ShipWeight so that it fits you and your way of working. The improved functionality are described under the different Tab names where they are found.
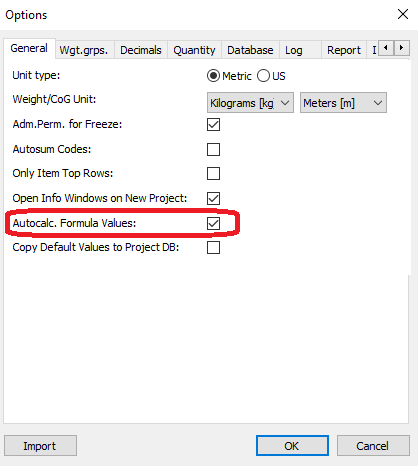
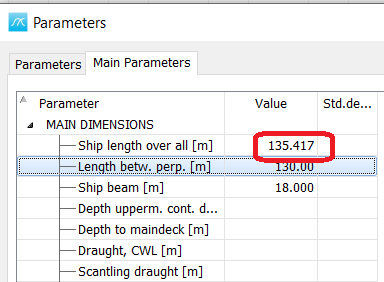
For Metric units it is now possible to select between meters[m] and millimeters[mm]. The check-box “Autocalc. Formula Values” is new as well. Check this check-box to automatic update calculations in Main window, Items window and for parameters when a parameter or field value updates.
Check the check-box “Hide Top Wgt.grp values” to hide the values of the selected top weight group if these numbers are more confusing than clarifying. Check the check-box “Sum All Wgt. grps” if you would like ShipWeight to sum all wgt. grps including those with status “Not Defined”. If the check-box “Questions before Summarize” is checked in addition, ShipWeight will ask before doing this summation.
For the 5 different quantities in the Quantity tab, 4 new merge options are now added. These are count, average, max and min.
It is possible to uncheck the check-box “Show Log window at Shutdown” in the Log tab, if you would like to disable the automatic opening of the logbook, when closing the software. By doing this you also disable the automatic summary of the changes, since the project was opened, in the project.
Here there are three new check-boxes, “default Filter All Parameters”, “Include All Reference Projects” and “Include database ID by default”. The check-box “default Filter All Parameters” sets all the filters by default before opening the Estimation window, and the checkbox “Include All Reference Projects” selects all the reference vessels for the estimate. The third check-box is used to disable the Database type and database ID name when a vessel should be exported to historical database. By unchecking the check-box, “Include database ID by default”, the default ID, in the Export to Historical database window, will only contain the ProjectID.
More:
![]() Customizing ShipWeight Project Options
Customizing ShipWeight Project Options
More flexibility and functionality have been added here in the Parameter Definition window. There are two new parameter types: link and memo parameter. If a parameter is set to link, that parameter takes in a path for where a file is located i.e., a link. On the other hand, if a parameter is set to a memo parameter this parameter can store RTF text, where it is possible to write in a formatted text. This can for example be used as input to a report created in Crystal Reports. The functionality for the composite parameter has also been increased, it is now possible to use Log10 for Reverse Polish Notation when defining a composite parameter. However, the biggest change is that it is now possible to add an image and an alias for each parameter. To add an image to a parameter, double click in the image field for that parameter and use the image viewer to add an image. An alias can be assigned to a parameter by writing the selected alias in the alias field for that parameter. This alias can then be used for defining other composite parameters in the Parameter Definition window, as part of a parameter value in the Parameters window, as a cell calculation in the Main window or as part of a calculation for an item in the Items window.
Example 1:
In this example we will add an image to a parameter.
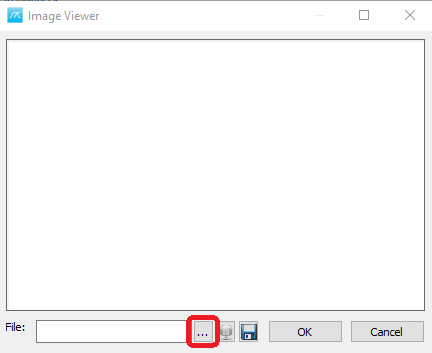
Make ready an image stored as a .bmp-file showing the depth to main deck, stored in a location of your choice. Open the Parameter Definition window, Database | Administrator | Parameter Definition… Find the parameter Depth to main deck by filtering the list. Double click in the field Image.

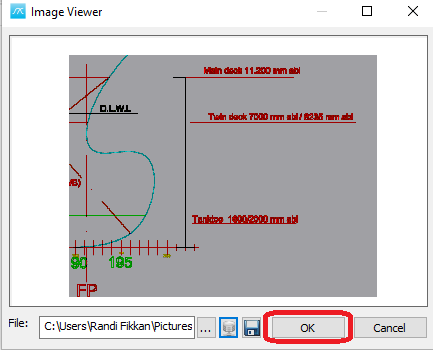
Now the Image viewer appears, click the Browse button to select the file location for the image you prepared earlier. When the image is selected click the OK button to store the picture.
Example 2:
In this example we will assign an alias to Lpp and use this alias for calculating LCG for a wgt. grp in the Main window.
Open the Parameter Definition window, Database | Administrator | Parameter Definition…
Use the name filter to find Length betw. Perp. and assign the alias L for Lpp. If you rather would use the ID of the Parameter in the Parameters window instead of the alias, that is possible as well.

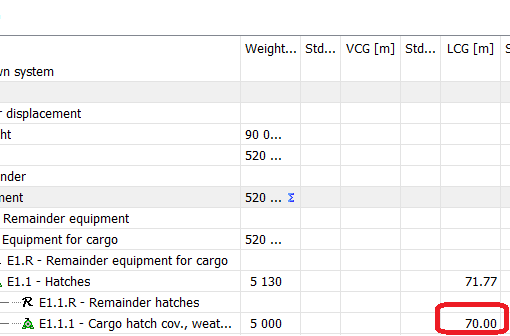
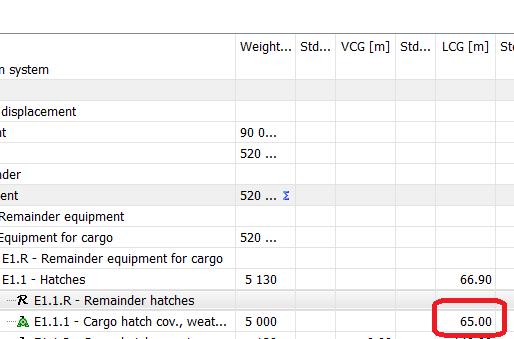
Now L can be used for Lpp in calculations. Let’s define LCG to be L/2 for E1.1 Hatches.
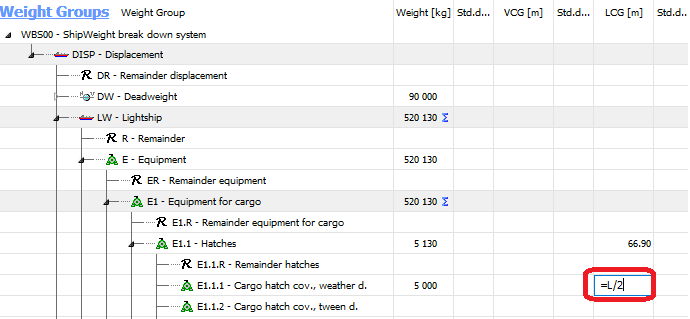
This field will now show the middle of Lpp as LCG. If the “Autocalc. Formula Values” in the General tab in the Options window has been checked, this value will be updated if Lpp changes.
Set the Lpp to 140m and then change it to 130m and see that LCG for wgt.grp. E1.1.1 changes from 70m to 65m.
More:
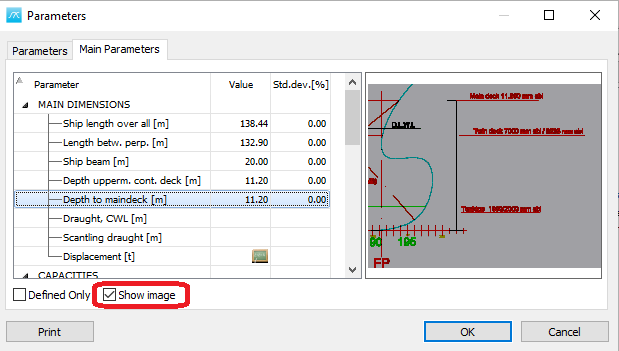
Here in the Parameters window the new parameter types, link, and memo, can be assigned with a link location and the text of your choice in the memo parameter. The image assigned to each parameter in the Parameter Definition window can be viewed by checking the Show Image checkbox. Mark the parameter, as shown in the picture below, to select which parameter to show the image for.
In addition to this it is now possible to write in a formula as input for a parameter in the Parameters window. An alias given in the Parameter Definition window can be used here if you would like to base the calculation on another parameter.
Example 3:
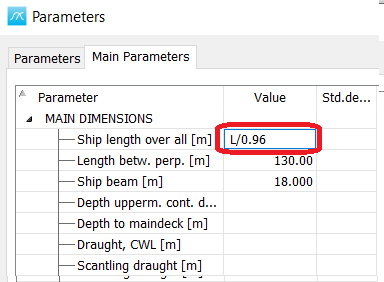
In this example we will use the alias created in Example 2 and define the Length Over All (Loa) to be Lpp/0.96.
Open ShipWeight and the Parameters window find the Loa parameter in the Main Parameters tab. Write in L/0.96 as the parameter value. Now we have used the Alias for Lpp to calculate the value for LOA.
It is possible to use the Parameter ID as well for this calculation, for Lpp the Parameter ID is lPE, so then the calculation would be =lPE/0.96.
More:
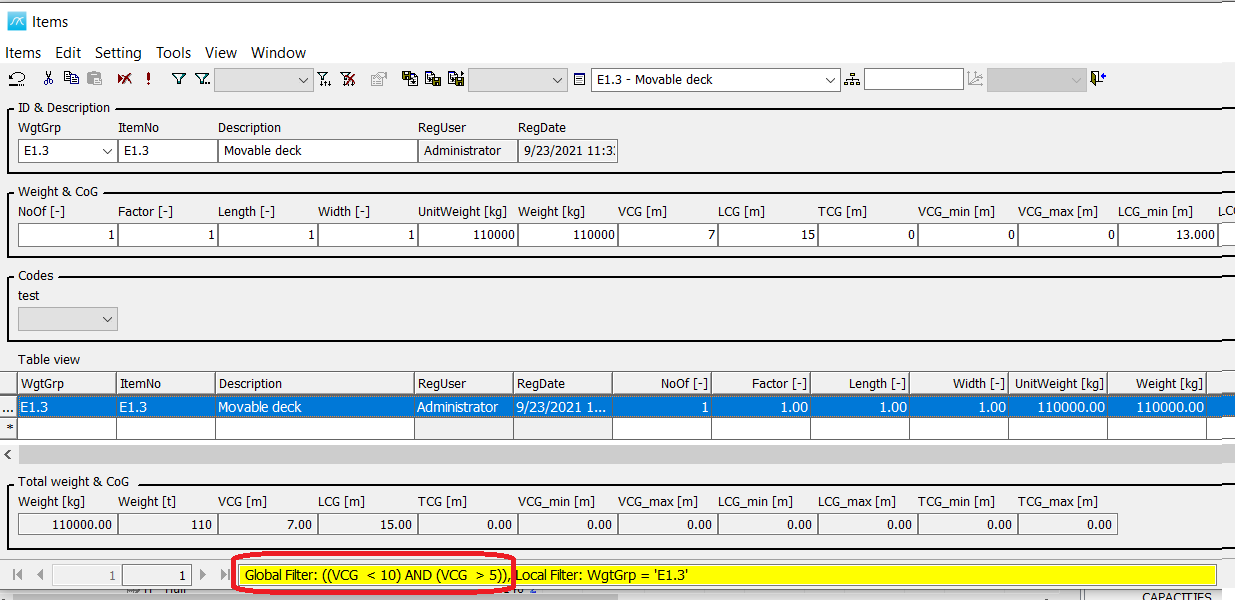
When a global filter is activated in the Main window, this filter will be visible in the Filter bar at the bottom of the Items window. In addition to this, the Change Field Values window has been made modular with respect to the Items window. E.g., it is possible to change item selection after the Change Field Values window has been opened.
More:
With the new scalable window for Project Type, it is now possible to adjust the window size. After selecting the Ship Types, they can be stored as a selection set. This selection set can be imported from a different project as a template. If you would like to print the selection set, a new Print button opens the ShipWeight regular Print Preview window. 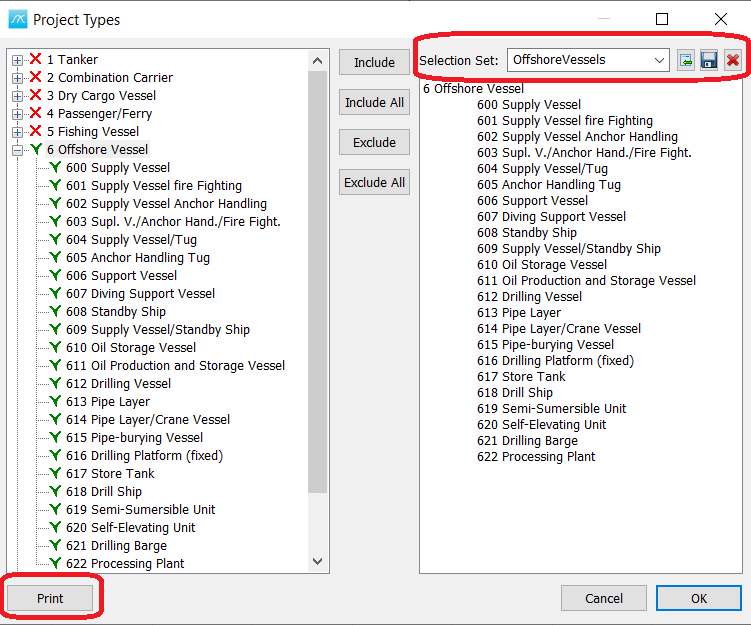
More:
![]() The Project Type Window
The Project Type Window
![]() The Import Project Type window
The Import Project Type window
![]() The Project Type Definition window
The Project Type Definition window
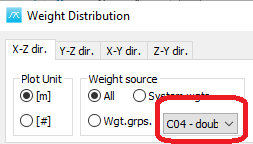
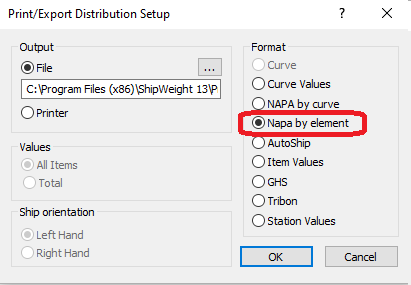
A new drop-down list is now available in the Weight Distribution window, it is now possible to select a custom code weight group in addition to the default weight to be presented as the source for the weight distribution curve. Furthermore, a new “NAPA by element” export method has been added, the new method transports the items from the Weight Distribution Curve such that it fits the NAPA Element definition. The syntax for this new method is as follows: ELE <ItemNo> W LCG TCG VCG LCG_min LCG_max ‘<description>’
Example: ELE E001 125.91 0.5 0 4.55 -5.5 4.9 ‘hull below 1dk (aft - #18)’
More:
In the Estimation window menu bar, it has been added a quick navigation drop down menu. This menu supports quick navigation from one wgt.grp. to another wgt.grp. from inside the Estimation window. See picture below to where to find this menu.

More:
![]() The Graph Area in the Estimation Window
The Graph Area in the Estimation Window
![]() The Project List in the Estimation Window
The Project List in the Estimation Window
![]() The Comparison Area in the Estimation Window
The Comparison Area in the Estimation Window
![]() Filter Coefficients in the Graph
Filter Coefficients in the Graph
![]() Saving your Settings in the Estimation Window
Saving your Settings in the Estimation Window
![]() Taking Uncertainty into Account
Taking Uncertainty into Account
![]() Using the Remainder Group in Estimation
Using the Remainder Group in Estimation
![]() Automatic Calculation of Weight Groups as Percentage of other Weight Groups
Automatic Calculation of Weight Groups as Percentage of other Weight Groups
![]() Starting a New Project Based on Earlier Estimation Results
Starting a New Project Based on Earlier Estimation Results
Export Historical Database window
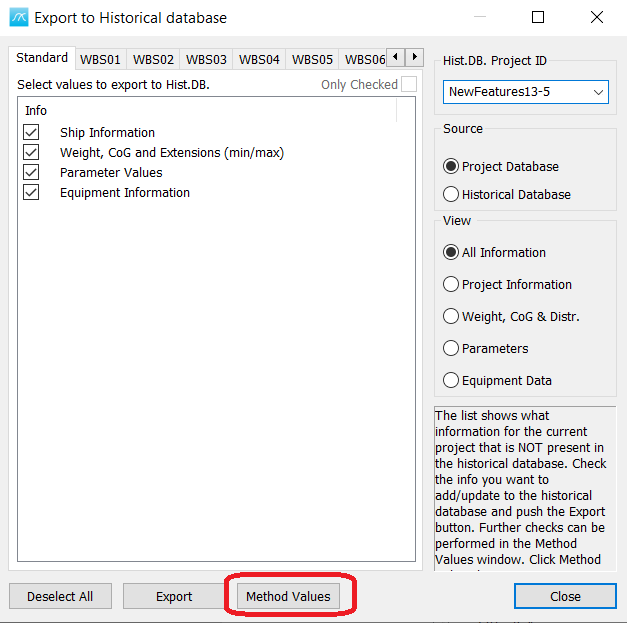
For the QA-process to get more efficient it is now possible to open the Method window from the Export to Historical database window. There it is easy to check if everything you need for your historical database project is up to date. The Method window can also be opened by selecting Method Values... in the View menu in the Main window menu bar.
More:
![]() Exporting to the Historical Database
Exporting to the Historical Database
![]() Making the Project Ready for Export to the Historical Database
Making the Project Ready for Export to the Historical Database
The New Crystal Report Viewer in ShipWeight
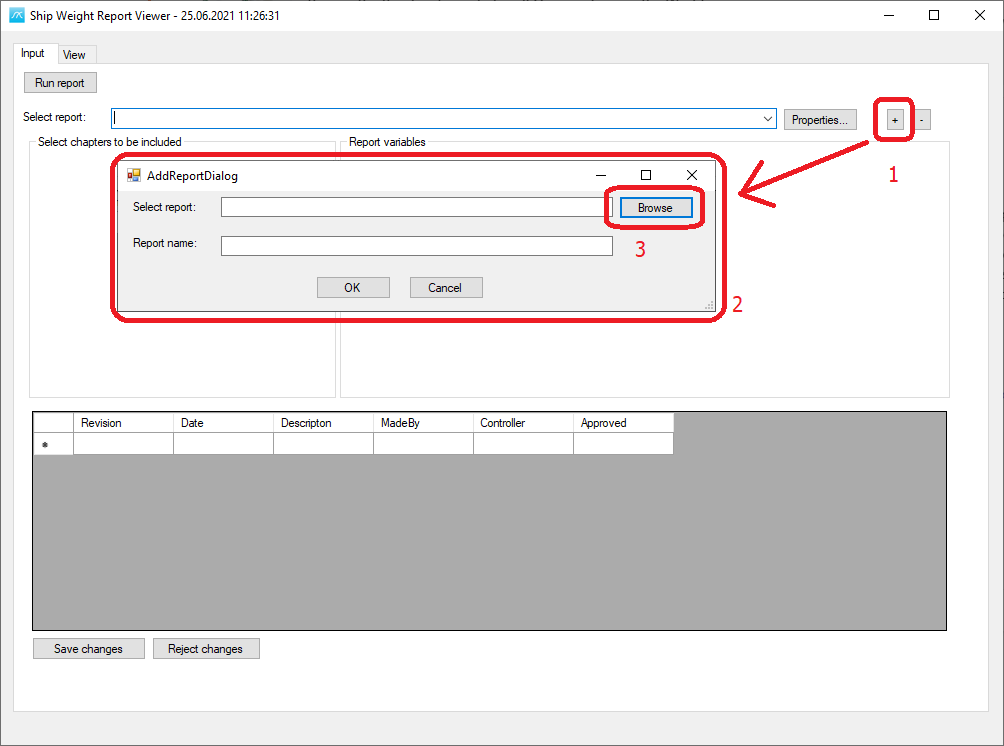
After you have opened the Crystal Report ShipWeight Viewer (menu: Project->Crystal Reports…), click the [+] button (1) to get to the Select Report Window (2), where you can hit the Browse button (3) and select the Crystal Reports Template file (*.rpt).
Next, give the report a name (optional) and click OK.
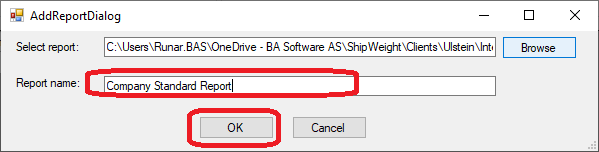
The name you enter for the report will now be the name shown in the droplist to select this report in future.
Selecting a report for the second time (and onwards…)
After a report have been added by selecting the *.rpt file, you can from now on find it and select it from the report droplist:
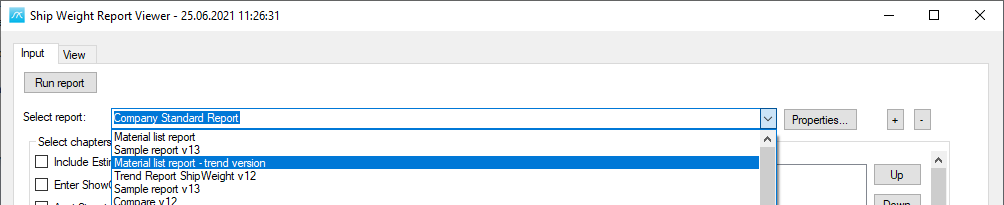
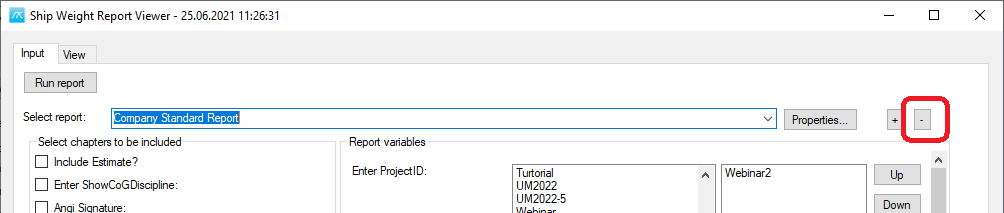
If you want to remove the report from the list, select it in the droplist and click the [-] button.
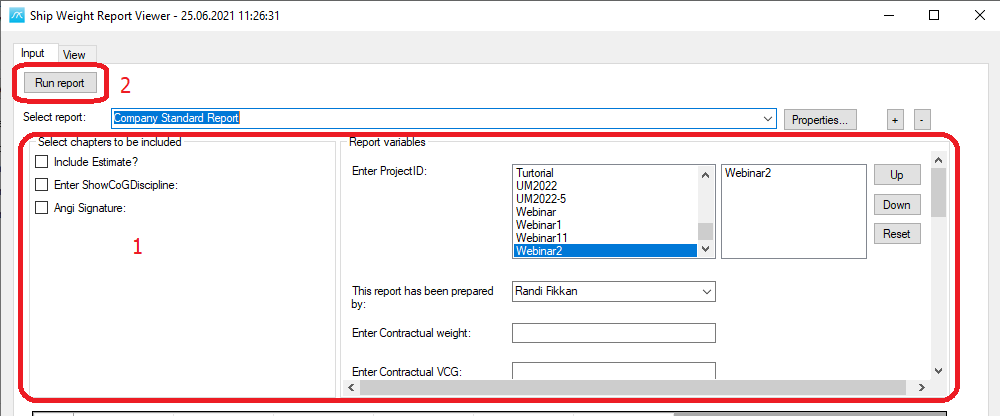
Setting report parameters and run the report
Fill in the report variables (1), which are custom for each report, and click the Run button (2)
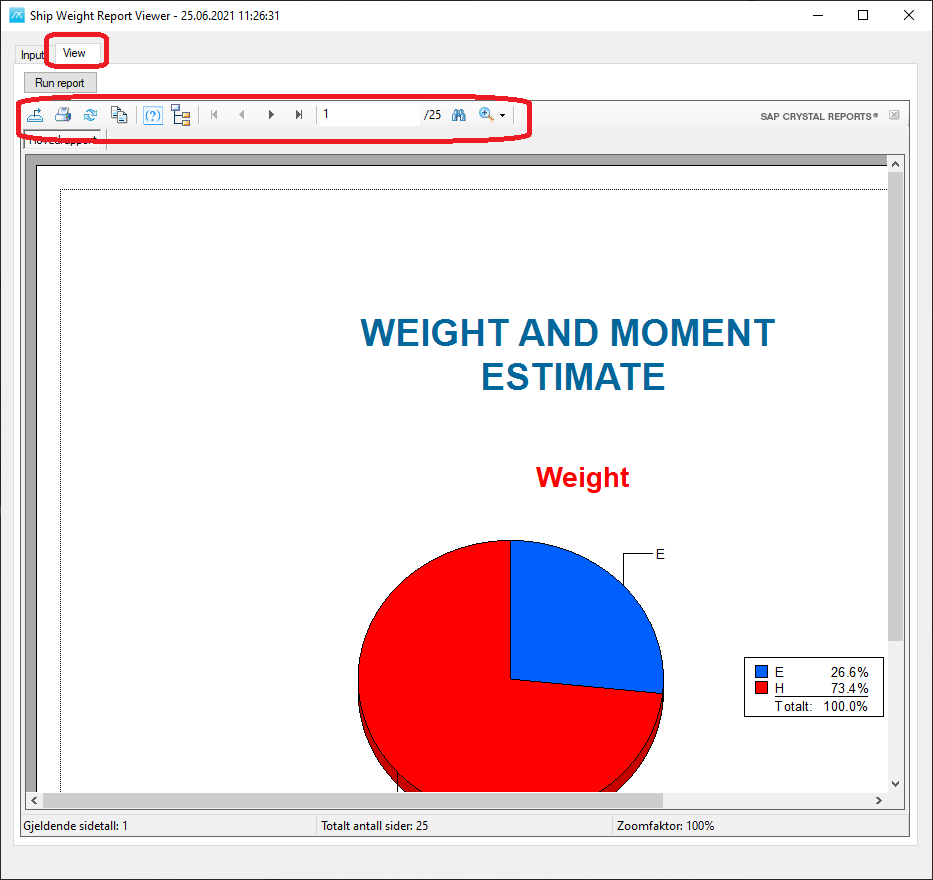
After the Run button is clicked, the report will start running and appear in the View area of the window, where you will find the toolbar with functionality to print, export, zoom, page, etc. similar to the previous version of the ShipWeight Report Viewer:
Setting default input variables for a report
To define default variables for the report (which then will be fill in every time you select the report), click the Properties button (1) and in the Properties Window, fill in default values in the area (2) and (3) and click OK (4).
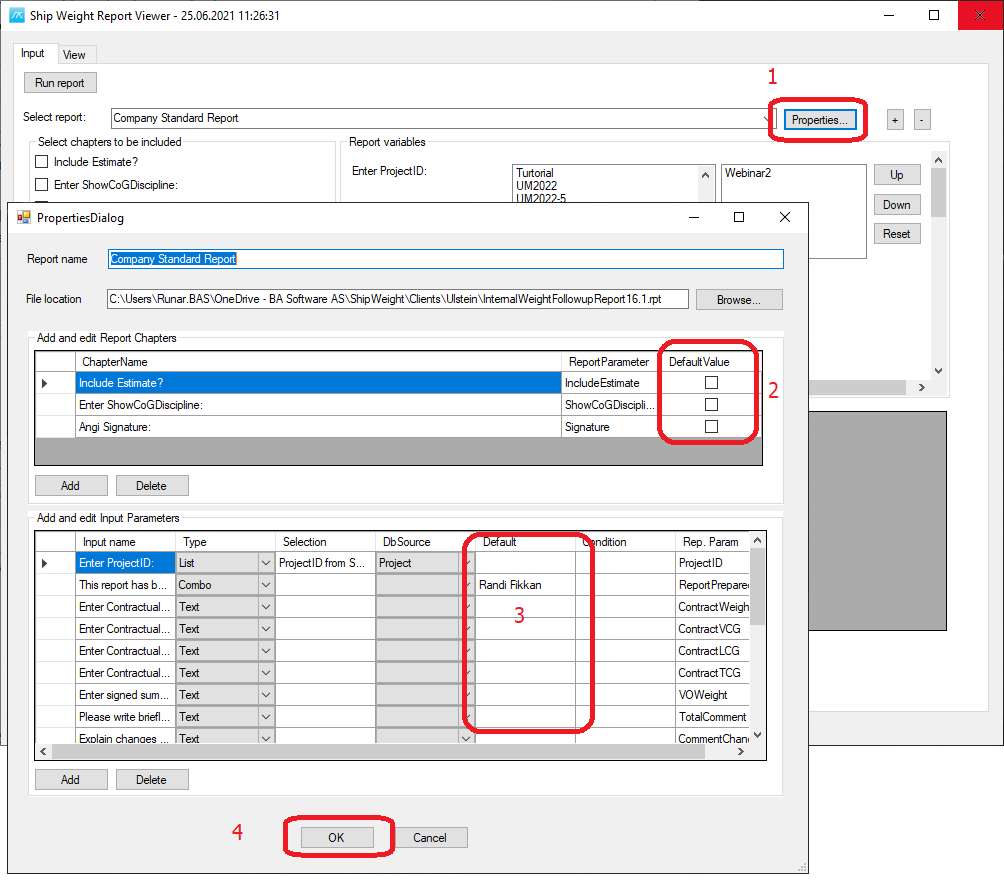
In the new viewer you may store revision information in a table connected to the report and a project. This information may also be retrieved and used in the report itself (requires this to be set up in the template file).
More:
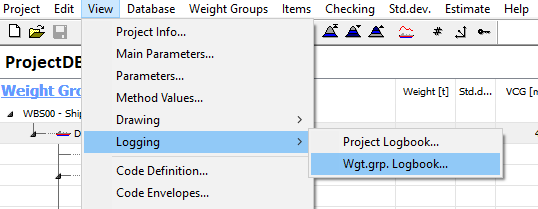
Enhanced logbook functionality
Now it is possible to log weight at a certain time by marking a weight group and then selecting View | Logging | Wgt.grp. Logbook in the View menu in the menu bar in the Main window.
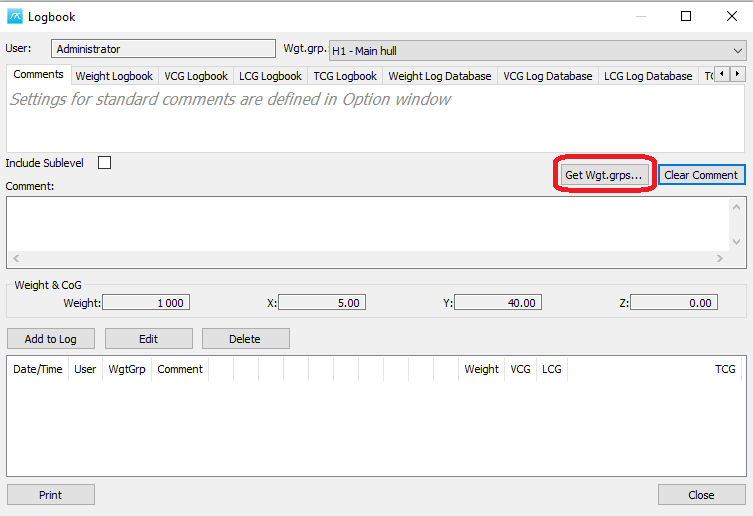
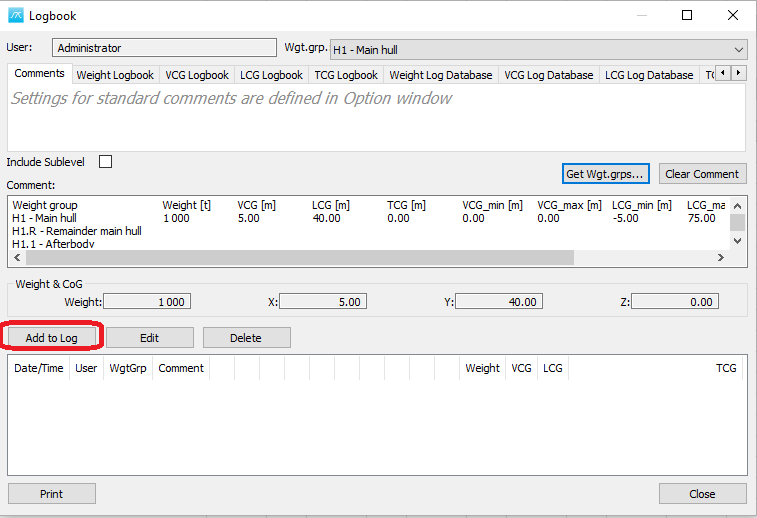
By clicking get wgt. grps… the weight groups data for this weight groups are added to the comment field in the Logbook window. To write this comment to the log click Add to Log.
If you throughout the project log the weight and CoG of a given wgt. grp. you can see the development in a graph in the tabs: Weight Logbook, VCG Logbook, LCG Logbook and TCG Logbook. If the graph does not show, maybe the window is to narrow. Then adjust the size of the Graph window on the top of the Logbook window, by drag and drop in the line where you see the red arrow in the picture below.
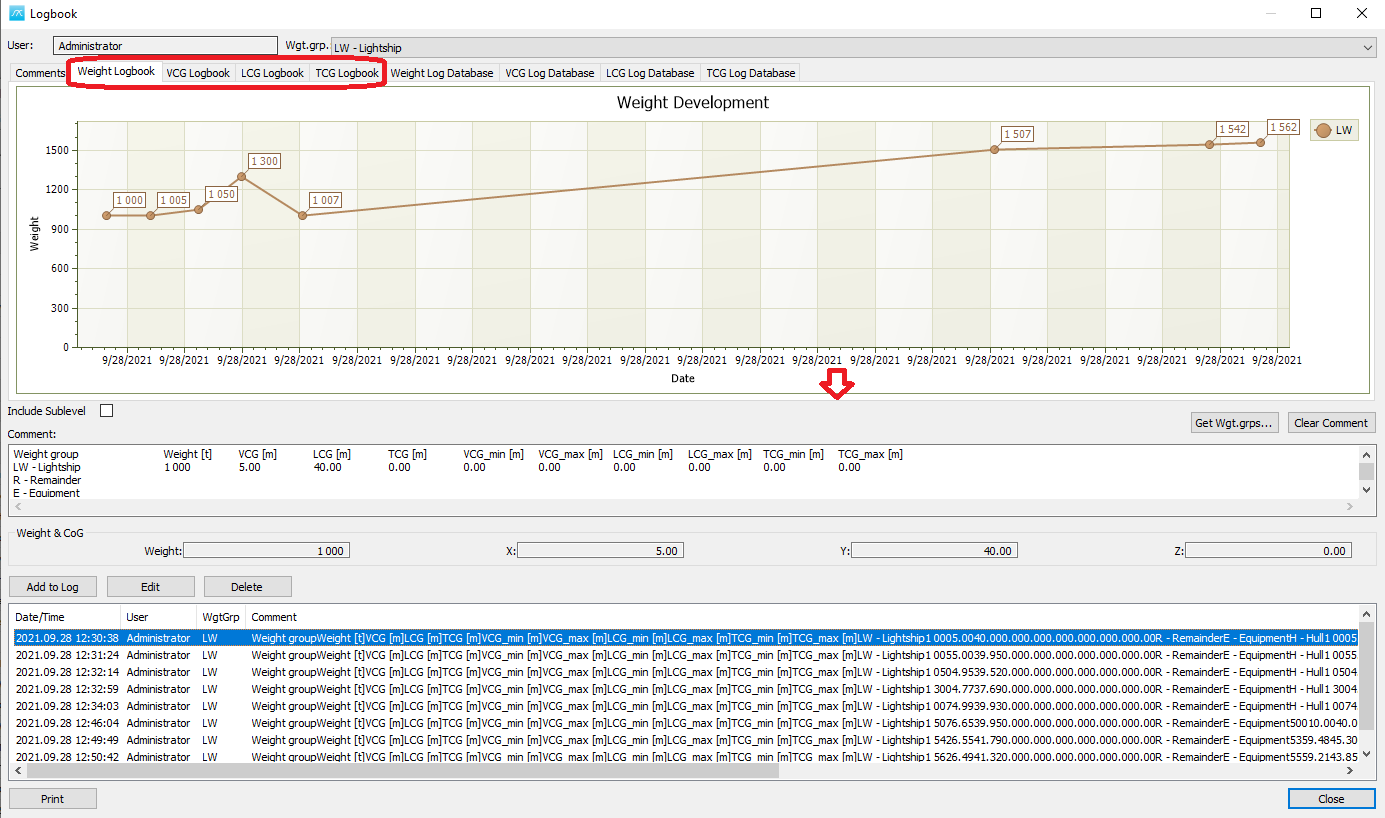
It is also possible to see the development according to the data in the Log Database. To see these graphs, select the tabs Weight/VCG/LCG/TCG Log Database. Check the checkbox “Include Sublevel” to include the sublevel of these graphs. In the picture you see that the graph is updated with the numbers from the sublevels with corresponding legend.

In addition to this ShipWeight generate an automatic log message by analyzation of the changes in the log database since the project was opened. For this to work the option “Show Log window at Shutdown” checkbox in the Options window at the Log tab must be checked when closing the project.
Example 4:
In this example we will log the changes for a project using the new automatic generated log message.
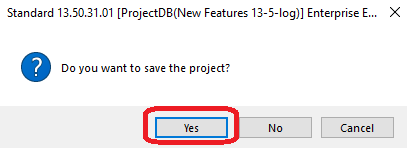
First open ShipWeight in an empty ShipWeight Project. Add a main hull steelweight item e.g., Wgt. grp: H1, ItemNo = 1000, Description: main hull, with weight 1000000kg, VCG at 5m, LCG at 40 m and TCG at 0m. Make sure you have checked the “Show Log window at Shutdown” checkbox in the Options window at the Log tab. Then close ShipWeight and answer yes to save the project.
Now the Logbook open with an automatic generated log message showing the changes since the project opened.
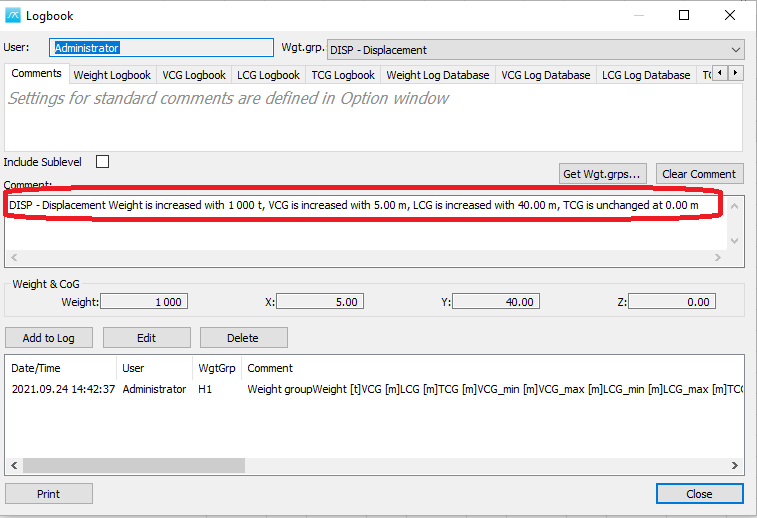
Click Add to Log to add this automatic generated text about change to the logbook.
More:
When creating a new custom code, you must define which type of AutoSum you would like your code to use. The new column “AutoSum” in the Code Definition Table is where you define how this code should summarize. It is possible to select one of the following alternatives - no sum, sum, average, weighted average(<weighted against>), count, minimum and maximum. Previously the custom code was summed as No sum or Sum. The added alternatives give more flexibility for how the different codes present themselves in the summary footer in the Items window, and as different fields in the Main window.
More:
![]() ShipWeight Basics: Modular Weight Distribution Report
ShipWeight Basics: Modular Weight Distribution Report
![]() ShipWeight Basics: Using Worksets with the Playground Area
ShipWeight Basics: Using Worksets with the Playground Area
![]() Administration and Customization: Set up a Secondary WBS in ShipWeight
Administration and Customization: Set up a Secondary WBS in ShipWeight
![]() Tutorial: Define Calculated Codes
Tutorial: Define Calculated Codes
![]() Training Manual: Setting Up Custom Codes and Item Settings
Training Manual: Setting Up Custom Codes and Item Settings
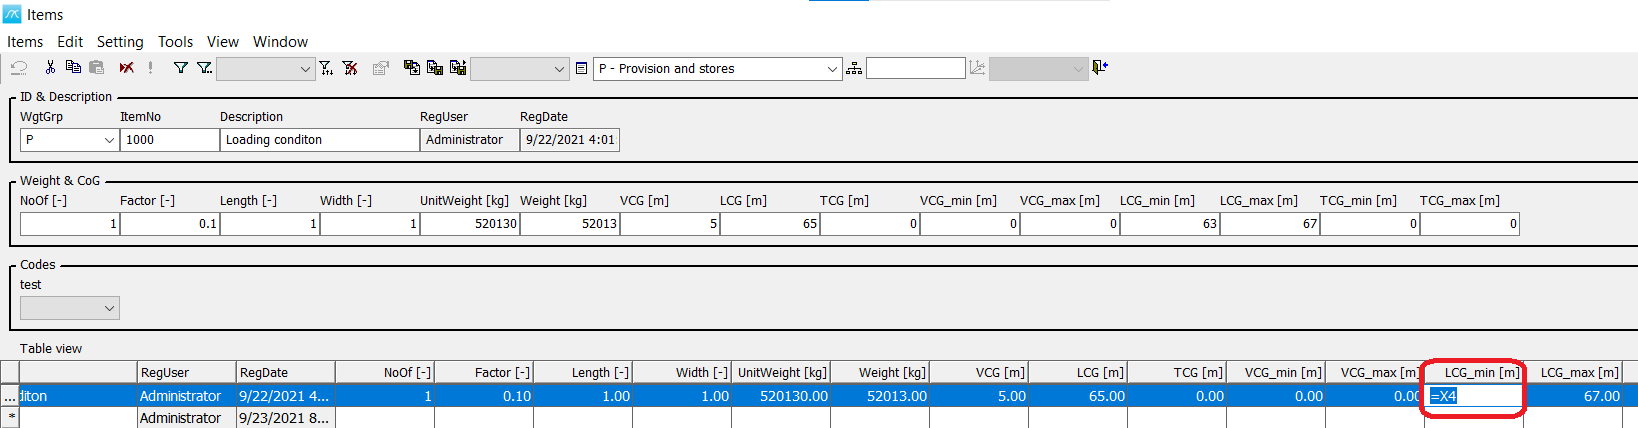
There has been an extensive upgrade of the calculations that are possible in ShipWeight. For each cell that takes in a number, in the Main window, in the Item window, Parameter Definition window, Parameters window, Method Definition window or the Estimation window, it can now take in a number, a calculation based on numbers, parameter references, calculations based on a parameter reference, or a calculation based on a combination of parameter references and numbers. When referring to a parameter the ID for that parameter found in the Parameter Definition window can be used, or an assigned Alias. In addition to this a syntax for easy definition of min/max for VCG, LCG and TCG is now available. It is possible to write =X4 in LCG_min or LCG_max and then ShipWeight will update LCG_min = LCG-2 and LCG_max = LCG+2. For VCG and TCG replace X with Z and Y. If this was not enough it is also possible to refer to the Weight and CoG for a given wgt. grp. To use the Weight and CoGs for a given wgt. grp. the syntax is as follows:
Weight: Wgt.grp|W Example: LW|W gives the Lightship weight
LCG: Wgt.grp |L Example: LW|L gives the Lightship LCG
VCG: Wgt.grp |V Example: LW|V gives the Lightship VCG
TCG: Wgt.grp |T Example: LW|T gives the Lightship TCG
Example 5:
In this example we will assign the Lightship Weight to a Parameter called Test. Then we will use this parameter to create a loading condition that is 10% load based on the total lightship weight. For this item we use the Lpp parameter to calculate the LCG and use the new syntax for equal distance from LCG to define the LCG_min and LCG_max.
Open the Parameter Definition window by selecting Database | Administrator | Parameter Definition from the Main window menu bar. Set up the Test Parameter as shown in the picture.
ID: te, Name: Test Description: “wgtgrp|W or V or T or L” Type: composite, Expression: LW|W

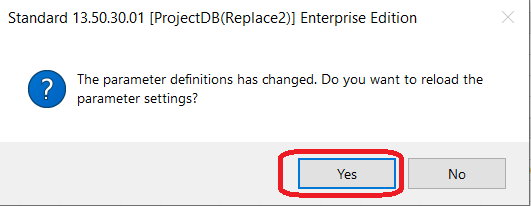
Click OK, when you have done this, and answer Yes to the question about reloading the parameter settings after it has changed.
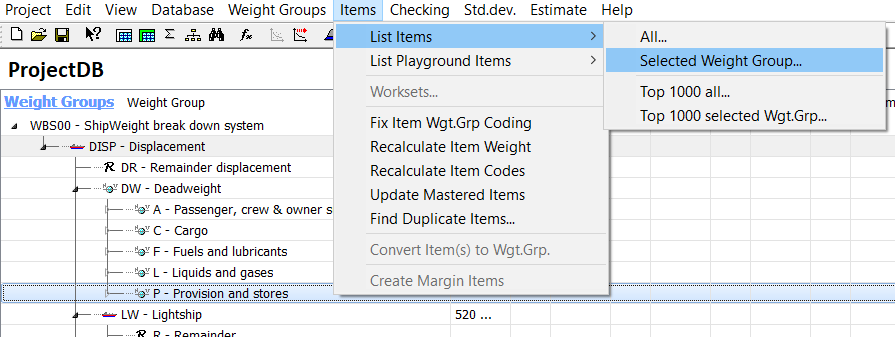
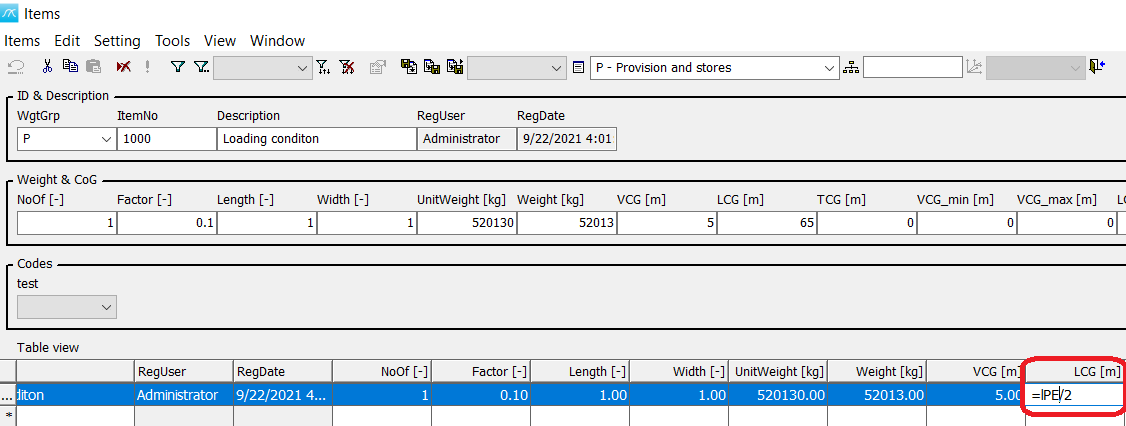
Click on a weight group that can be used for the loading condition, for instance P-Provision and stores. Then open the Items window by clicking Items | List Items | Selected Weight Group… in the Main window menu bar.
Create a loading condition Item by using the Test Parameter we just created. Set the Factor to 0,1 to get 10% out of the Test Parameter and for Unit Weight write in =te.

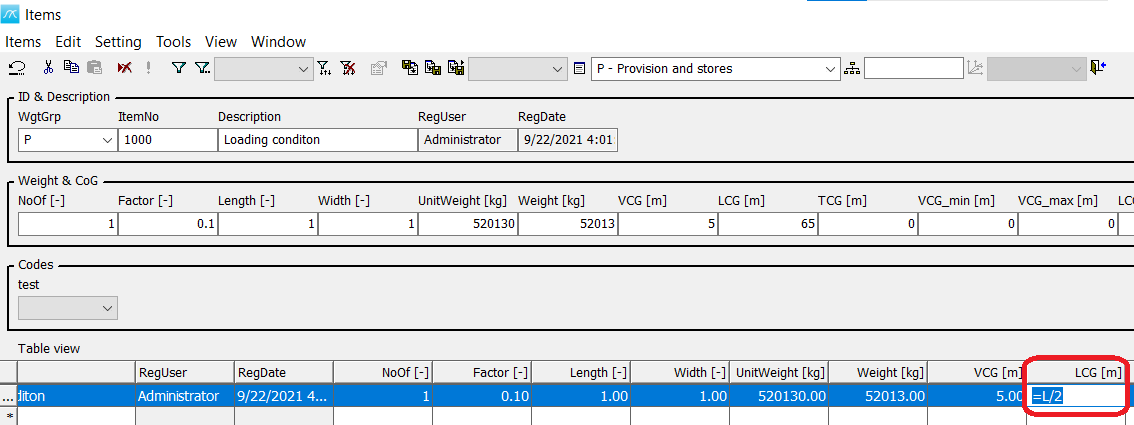
Then we will define the LCG to be Lpp/2. It is now two options: 1. Use the Parameter ID for Lpp - lPE, or 2: Use the alias L created in Example 1 for Lpp. For using the Parameter ID the syntax is =lPE/2, and when using the alias the syntax is =L/2.
Then we will use the LCG functionality to set LCG_min and LCG_max. Write in =X4 in LCG_min, now LCG-min will be LCG-2 and LCG_max will be LCG+2.
Updates to the help functionality
There have been updated more help functionality such as tooltips and explanatory text both in Items- and Estimation window. E.g., when selecting more than one item in the Items window the tooltip will now show the count of selected items, and the total weight and CoG for those items. There are also added tooltips for custom codes and wgt.grp., showing the description, both in single record and table view.
Possible to overwrite existing project
It is now possible to overwrite an existing project in the Save As window.